Canon imageCLASS D761 imageCLASS D700 Series Set-up Instructions - Page 7
Windows XP - driver
 |
View all Canon imageCLASS D761 manuals
Add to My Manuals
Save this manual to your list of manuals |
Page 7 highlights
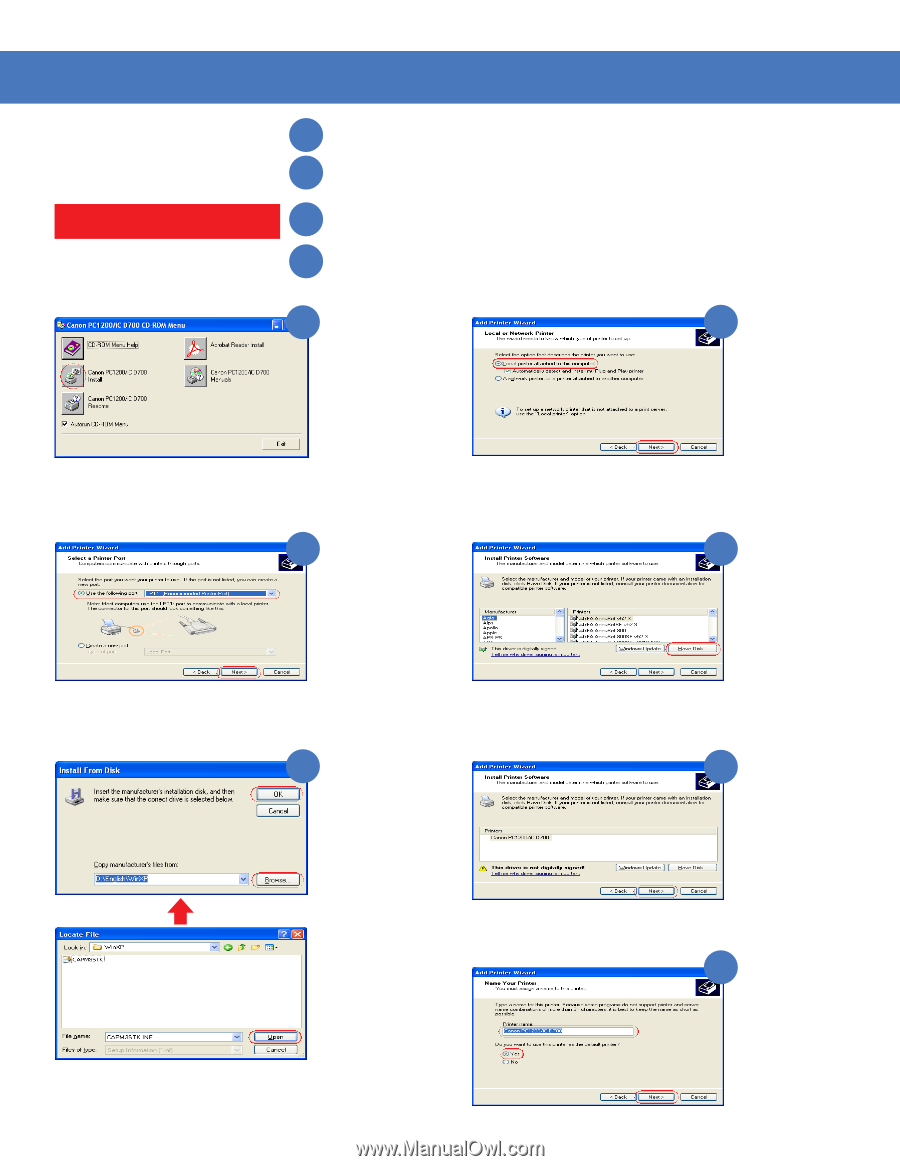
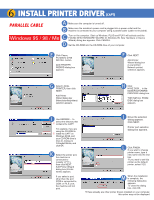
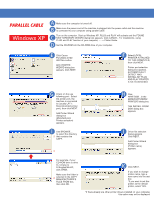
PARALLEL CABLE Windows XP A Make sure the computer is turned off. B Make sure the power cord of the machine is plugged into the power outlet and the machine is connected to your computer using parallel cable. C Turn on the computer. Start up Windows XP. PLUG and PLAY will activate and the FOUND NEW HARDWARE WIZARD dialog box appears. Click CANCEL. For installations, using PLUG and PLAY function of your computer, -----> Printer Guide. D Set the CD-ROM into the CD-ROM drive of your computer. E Click Canon PC1200/iC D700 INSTALL button. ADD PRINTER WIZARD dialog box appears. Click NEXT. F Select LOCAL PRINTER ATTACHED TO THIS COMPUTER, then click NEXT. Printer port selection dialog box appears. AUTOMATICALLY DETECT AND INSTALL MY PLUG AND PLAY PRINTER is not recommended. G Check on the use following port: Select the printer port, the machine is connected to (usually LPT1: Recommended printer port), then click NEXT. Add Printer Wizard dialog box (Manufacturers/ Printers selection) appears. I Use BROWSE... to select the directory 3 that contains the CAPT. 1 H Click HAVE DISK...in the MANUFACTURERS/ PRINTERS dialog box. THE INSTALL FROM DISK dialog box appears. J Driver file selection dialog appears. Click NEXT. Add Printer Wizard dialog box (Printer name) appears. For example, if your CD-ROM drive is drive D:, browse to D:/English/WinXP, click OPEN. Make sure the folder is 2 selected in the COPY MANUFACTURER'S FILES FROM box, then click OK. K Click NEXT. If you wish to change printer name, type a new name into the text box. *If you want to set this printer as the default printer, select YES. *If there already are other printer drivers installed on your computer, this option may not be displayed.
-
 1
1 -
 2
2 -
 3
3 -
 4
4 -
 5
5 -
 6
6 -
 7
7 -
 8
8
 |
 |