Canon imageCLASS MF212w Getting Started Guide - Page 11
Setting Wireless LAN - wireless setup
 |
View all Canon imageCLASS MF212w manuals
Add to My Manuals
Save this manual to your list of manuals |
Page 11 highlights
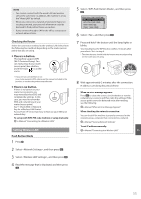
NOTE • You cannot connect both the wired LAN and wireless LAN at the same time. In addition, the machine is set to the "Wired LAN" by default. • When you connect to a network environment that is not security protected, your personal information could be disclosed to third parties. Please use caution. • If you connect through a LAN in the office, contact your network administrator. Checking the Router Select the connection method to the wireless LAN. Select from the following two methods depending on the router (access point) that you are using. ● There is a button. This machine supports WPS (Wi-Fi Protected Setup). You can easily setup if your router (access point) has a button, and if the mark is on the router. If you are not sure whether or not your router supports WPS, please see the manual included in the product, or contact the product manufacturer. ● There is no button. If there is no button on your router (access point), you may manually select SSID and complete the settings. In this case, you need to remember SSID and network key of your router (access point). See "1 Check SSID or Network Key for a Wireless LAN Router/ Access Point." (P.12) to learn how to find out your SSID and network key. To set up with WPS PIN code method, or setup manually: e-Manual "Connecting to a Wireless LAN" Setting Wireless LAN Push Button Mode 1 Press . 2 Select , and then press . 3 Select , and then press . 4 Read the message that is displayed, and then press . 5 Select , and then press . Wireless LAN Settings WPS Push Button Mode WPS PIN Code Mode SSID Settings Power Save Mode 6 Select , and then press . 7 Press and hold* the button until the lamp lights or blinks. You should press the WPS button within 2 minutes after you select in step 6. * The time that you should hold the button may vary depending on the router you are using. 8 Wait approximately 2 minutes after the connection. IP address is set during this period of time. When an error message appears: Press to close the screen, check whether or not the network key is correct, and then retry the settings. If the access point cannot be detected even after retrying, see the following. e-Manual "When an Error Message Appears" When checking the network connection: You can check if the machine is properly connected to the network using a computer that connected to a network. e-Manual "Viewing Network Settings" To set IP address manually: e-Manual "Connecting to a Wireless LAN" En 11
-
 1
1 -
2
-
3
-
4
-
5
-
 6
6 -
 7
7 -
 8
8 -
 9
9 -
 10
10 -
 11
11 -
 12
12 -
 13
13 -
 14
14 -
 15
15 -
 16
16 -
17
-
18
-
19
-
20
-
21
-
22
-
23
-
24
-
25
-
26
-
27
-
28
-
29
-
30
-
31
-
32
-
33
-
34
-
35
-
36
-
37
-
38
-
39
-
40
-
41
-
42
-
43
-
44
-
45
-
46
-
47
-
48
-
49
-
50
-
51
-
52
-
53
-
54
-
55
-
56
 |
 |
