Canon imageFORMULA DR-2080C Color Startup Guide - Page 33
The DR-2080C is registered as CANON DR-2080C SCSI or CANON
 |
View all Canon imageFORMULA DR-2080C Color manuals
Add to My Manuals
Save this manual to your list of manuals |
Page 33 highlights
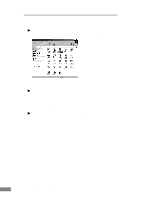
4. Load the setup disc into the computer's CD-ROM drive. 5. Type "D:\INF" (where "D" is the drive letter assigned to your CD-ROM drive) and then click the OK button. 6. In the "Driver Files Search Results" screen, click the Next button. 7. If the message "Digital Signature Not Found" appears, simply click Yes to continue installation. 8. On the "Completing the Found New Hardware Wizard" screen, click the Finish button. ● If you are using Windows XP, the "Found New Hardware Wizard" dialog box appears. 1. Load the setup disc into the computer's CD-ROM drive. 2. In the "Welcome to the Found New Hardware Wizard" screen, select "Install from a list or specific location (Advanced)", and then click the Next button. 3. Select "Search for the best driver in these locations", and then clear the "Search removable media (floppy, CD-ROM...)" check box. Select "Include this location in the search", type "D:\INF" (where "D" is the drive letter assigned to your CD-ROM drive), and then click the Next button. 4. Click the Continue Anyway button in the "Hardware Installation" dialog box. Although a message appears indicating that the driver "has not passed Windows logo testing", simply continue operation. 5. Click the Finish button in the "Completing the Found New Hardware Wizard" screen. Notice ● The DR-2080C is registered as "CANON DR-2080C SCSI" or "CANON DR-2080C USB" in the "Imaging Device" directory. ● The displayed device name of the DR-2080C differs depending on the connection, via SCSI or via USB. When having changed the connection, be sure to let the PC recognize the scanner once again. Installing the Scanner 31
-
 1
1 -
2
-
3
-
4
-
5
-
6
-
7
-
8
-
9
-
10
-
11
-
12
-
13
-
14
-
15
-
16
-
17
-
18
-
19
-
20
-
21
-
22
-
23
-
24
-
25
-
26
-
27
-
 28
28 -
 29
29 -
 30
30 -
 31
31 -
 32
32 -
 33
33 -
 34
34 -
 35
35 -
 36
36 -
 37
37 -
 38
38 -
39
-
40
-
41
-
42
-
43
-
44
-
45
-
46
-
47
-
48
-
49
-
50
-
51
-
52
-
53
-
54
-
55
-
56
-
57
-
58
-
59
-
60
-
61
-
62
-
63
-
64
-
65
-
66
-
67
-
68
-
69
-
70
-
71
-
72
-
73
-
74
-
75
-
76
 |
 |
