Casio CTK4000 User Guide - Page 25
AutoSto, DELETE, Sure?
 |
View all Casio CTK4000 manuals
Add to My Manuals
Save this manual to your list of manuals |
Page 25 highlights
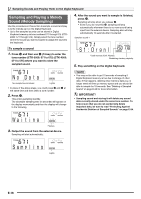
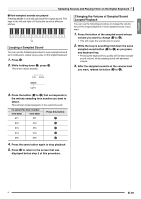
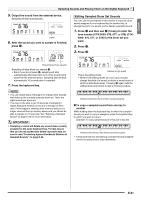
English Sampling Sounds and Playing Them on the Digital Keyboard Changing to Manual Sampling Stop Normally the Digital Keyboard will stop sampling automatically whenever it detects there is no sound input. You can use the following procedure to enable manual sampling stop, which will cause sampling to continue until you press a button to stop it. You can use this to insert silence after the sampled sound. 1. Press cs and then use the br (10-key) [4] ( ) and [6] ( ) keys to display "SAMPLING" (page E-6). 2. Press the br (10-key) [7] (ENTER) key. 3. Press the br (10-key) [6] ( ) key. Au t oSt op 4. Press the br (10-key) [-] key to turn off automatic sampling stop. Even when there is no sound input from an external device, sampling will continue until you press and release cr or a keyboard key. • When manual sampling stop is enabled, sampling stops when you release cr or the keyboard key, not when you press it. Sampling does not stop if you hold down the button or key. Deleting a Sampled Sound You can use the following procedure to specify a sampled tone number and delete its data. 1. Press cs and then use the br (10-key) [4] ( ) and [6] ( ) keys to display "DELETE" (page E-6). DELETE Flashes 2. Press the br (10-key) [7] (ENTER) key. S1 :Or gn l Used memory (Unit: Kbytes) Remaining memory capacity 3. Use the br (10-key) [-] and [+] keys to select the tone number of the data you want to delete. 4. Press the br (10-key) [7] (ENTER) key. This displays a delete confirmation message. Su r e? 5. Press the br (10-key) [+] (YES) key to delete the data, or [-] (NO) or [9] (EXIT) to cancel the delete operation. • After the delete procedure is complete, "Complete" will appear on the display followed by the screen in step 2 of the above procedure. • For information about deleting individual drum sounds in a drum sampling set, see "Editing Sampled Drum Set Sounds" on page E-21. E-23
-
 1
1 -
2
-
3
-
4
-
5
-
6
-
7
-
8
-
9
-
10
-
11
-
12
-
13
-
14
-
15
-
16
-
17
-
18
-
19
-
 20
20 -
 21
21 -
 22
22 -
 23
23 -
 24
24 -
 25
25 -
 26
26 -
 27
27 -
 28
28 -
 29
29 -
 30
30 -
31
-
32
-
33
-
34
-
35
-
36
-
37
-
38
-
39
-
40
-
41
-
42
-
43
-
44
-
45
-
46
-
47
-
48
-
49
-
50
-
51
-
52
-
53
-
54
-
55
-
56
-
57
-
58
-
59
-
60
-
61
-
62
-
63
-
64
-
65
-
66
-
67
-
68
-
69
-
70
-
71
-
72
-
73
-
74
-
75
-
76
-
77
-
78
-
79
-
80
 |
 |
