Casio EX-FH25 Owners Manual - Page 26
To shoot a snapshot, Single Shot.
 |
UPC - 079767493264
View all Casio EX-FH25 manuals
Add to My Manuals
Save this manual to your list of manuals |
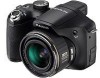
Page 26 highlights
To shoot a snapshot Diopter dial [EVF/LCD] Viewfinder Monitor screen [r] (REC) Shutter button Mode dial [SET] [8] [2] [4] [6] The following procedure describes how to shoot a single snapshot. For information about shooting a series of shots (Continuous Shutter), see page 56. 1. Remove the lens cap and then press [r] (REC) to turn on the camera. 2. Set the mode dial to t (Single Shot). 3. Press [8]. 4. Use [8] and [2] to select the top option in the control panel (Exposure mode). 5. Use [4] and [6] to select t (Auto) and then press [SET]. • You can use either monitor screen or viewfinder to compose the image. Each press of the [EVF/LCD] button cycles through the available monitor screen and viewfinder on/off settings (page 158). If the image in the viewfinder appears blurry, use the diopter dial to adjust it. Snapshot mode icon Remaining snapshot memory capacity (page 183) 26 Quick Start Basics
-
 1
1 -
2
-
3
-
4
-
5
-
6
-
7
-
8
-
9
-
10
-
11
-
12
-
13
-
14
-
15
-
16
-
17
-
18
-
19
-
20
-
 21
21 -
 22
22 -
 23
23 -
 24
24 -
 25
25 -
 26
26 -
 27
27 -
 28
28 -
 29
29 -
 30
30 -
 31
31 -
32
-
33
-
34
-
35
-
36
-
37
-
38
-
39
-
40
-
41
-
42
-
43
-
44
-
45
-
46
-
47
-
48
-
49
-
50
-
51
-
52
-
53
-
54
-
55
-
56
-
57
-
58
-
59
-
60
-
61
-
62
-
63
-
64
-
65
-
66
-
67
-
68
-
69
-
70
-
71
-
72
-
73
-
74
-
75
-
76
-
77
-
78
-
79
-
80
-
81
-
82
-
83
-
84
-
85
-
86
-
87
-
88
-
89
-
90
-
91
-
92
-
93
-
94
-
95
-
96
-
97
-
98
-
99
-
100
-
101
-
102
-
103
-
104
-
105
-
106
-
107
-
108
-
109
-
110
-
111
-
112
-
113
-
114
-
115
-
116
-
117
-
118
-
119
-
120
-
121
-
122
-
123
-
124
-
125
-
126
-
127
-
128
-
129
-
130
-
131
-
132
-
133
-
134
-
135
-
136
-
137
-
138
-
139
-
140
-
141
-
142
-
143
-
144
-
145
-
146
-
147
-
148
-
149
-
150
-
151
-
152
-
153
-
154
-
155
-
156
-
157
-
158
-
159
-
160
-
161
-
162
-
163
-
164
-
165
-
166
-
167
-
168
-
169
-
170
-
171
-
172
-
173
-
174
-
175
-
176
-
177
-
178
-
179
-
180
-
181
-
182
-
183
-
184
-
185
-
186
-
187
-
188
-
189
-
190
-
191
-
192
 |
 |
