Casio EX-H10BK Owners Manual - Page 106
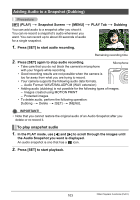
image composition here is as close as possible, the subject you want to extract. Take care so
 |
View all Casio EX-H10BK manuals
Add to My Manuals
Save this manual to your list of manuals |
Page 106 highlights
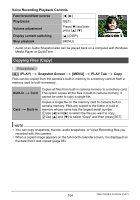
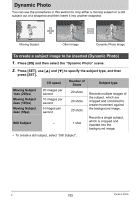
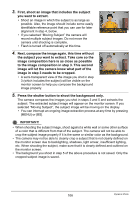
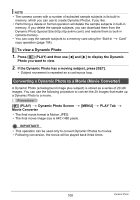
3. First, shoot an image that includes the subject you want to extract. • Shoot an image in which the subject is as large as possible. Also, the image should include some easily identifiable reference point that you can use for later alignment in step 4, below. • If you selected "Moving Subject" the camera will record multiple subject images. Do not move the camera until shooting is complete. • Flash is turned off automatically at this time. 4. Next, compose the image again, this time without the subject you want to extract. Take care so the image composition here is as close as possible to the image composition in step 3. This second image will let the camera know what part of the image in step 3 needs to be cropped. • A semi-transparent view of the image you shot in step 3 (which includes the subject) will be visible on the monitor screen to help you compose the background image properly. 5. Press the shutter button to shoot the background only. The camera compares the images you shot in steps 3 and 5 and extracts the subject. The extracted subject image will appear on the monitor screen. If you selected "Moving Subject", the subject image will be moving on the display. • You can interrupt an ongoing image extraction process at any time by pressing [MENU] or [BS]. IMPORTANT! • When shooting the subject image, shoot against a white wall or some other surface of a color that is different from that of the subject. The camera will not be able to crop the subject image properly if it is the same or similar color as the background. • The camera may not be able to cleanly crop a subject that is not clearly defined on the monitor screen due to backlighting, shadows, light smear, insufficient lighting, etc. When shooting the subject, make sure that it is clearly defined and outlined on the monitor screen. • The background you shoot in step 5 of the above procedure is not saved. Only the cropped subject image is saved. 106 Dynamic Photo
-
 1
1 -
2
-
3
-
4
-
5
-
6
-
7
-
8
-
9
-
10
-
11
-
12
-
13
-
14
-
15
-
16
-
17
-
18
-
19
-
20
-
21
-
22
-
23
-
24
-
25
-
26
-
27
-
28
-
29
-
30
-
31
-
32
-
33
-
34
-
35
-
36
-
37
-
38
-
39
-
40
-
41
-
42
-
43
-
44
-
45
-
46
-
47
-
48
-
49
-
50
-
51
-
52
-
53
-
54
-
55
-
56
-
57
-
58
-
59
-
60
-
61
-
62
-
63
-
64
-
65
-
66
-
67
-
68
-
69
-
70
-
71
-
72
-
73
-
74
-
75
-
76
-
77
-
78
-
79
-
80
-
81
-
82
-
83
-
84
-
85
-
86
-
87
-
88
-
89
-
90
-
91
-
92
-
93
-
94
-
95
-
96
-
97
-
98
-
99
-
100
-
 101
101 -
 102
102 -
 103
103 -
 104
104 -
 105
105 -
 106
106 -
 107
107 -
 108
108 -
 109
109 -
 110
110 -
 111
111 -
112
-
113
-
114
-
115
-
116
-
117
-
118
-
119
-
120
-
121
-
122
-
123
-
124
-
125
-
126
-
127
-
128
-
129
-
130
-
131
-
132
-
133
-
134
-
135
-
136
-
137
-
138
-
139
-
140
-
141
-
142
-
143
-
144
-
145
-
146
-
147
-
148
-
149
-
150
-
151
-
152
-
153
-
154
-
155
-
156
-
157
-
158
-
159
-
160
-
161
-
162
-
163
-
164
-
165
-
166
-
167
-
168
-
169
-
170
-
171
-
172
-
173
-
174
-
175
-
176
-
177
-
178
-
179
-
180
-
181
-
182
-
183
-
184
-
185
-
186
-
187
-
188
-
189
 |
 |
