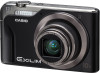
Casio EX-H10BK Owners Manual - Page 35
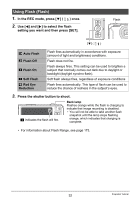
Optimizing Image Brightness (Lighting), In the REC mode, press [SET].
 |
View all Casio EX-H10BK manuals
Add to My Manuals
Save this manual to your list of manuals |
Page 35 highlights
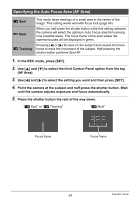
IMPORTANT! • "È Multi" cannot be selected for the Auto Focus area while you are using Face Detection (page 39). • When "Ë Tracking" is selected, simply press [4] or [6]. The focus frame will track the movement of the subject, even if you do not half-press the shutter button. • While "Ë Tracking" is selected, the [4] and [6] keys do not perform functions assigned to them (page 73). • "Ë Tracking" cannot be selected for the Auto Focus area while you are using Auto Shutter (page 66). • Selecting "Ë Tracking" can cause vibration and noise to occur due to lens operation while tracking a subject. This does not indicate malfunction. Optimizing Image Brightness (Lighting) You can use this setting to optimize the balance between bright areas and dark areas when shooting images. 1. In the REC mode, press [SET]. 2. Use [8] and [2] to select the fourth Control Panel option from the top (Lighting). 3. Use [4] and [6] to select the setting you want and then press [SET]. Î Extra Ï On Ì Off Performs a higher level of brightness correction than the "On" setting. When this option is selected, it takes longer for the image to be stored after the shutter button is pressed. Performs brightness correction. Does not perform brightness correction. • You also can optimize the balance between bright areas and dark areas in existing images (page 96). 35 Snapshot Tutorial
-
 1
1 -
2
-
3
-
4
-
5
-
6
-
7
-
8
-
9
-
10
-
11
-
12
-
13
-
14
-
15
-
16
-
17
-
18
-
19
-
20
-
21
-
22
-
23
-
24
-
25
-
26
-
27
-
28
-
29
-
 30
30 -
 31
31 -
 32
32 -
 33
33 -
 34
34 -
 35
35 -
 36
36 -
 37
37 -
 38
38 -
 39
39 -
 40
40 -
41
-
42
-
43
-
44
-
45
-
46
-
47
-
48
-
49
-
50
-
51
-
52
-
53
-
54
-
55
-
56
-
57
-
58
-
59
-
60
-
61
-
62
-
63
-
64
-
65
-
66
-
67
-
68
-
69
-
70
-
71
-
72
-
73
-
74
-
75
-
76
-
77
-
78
-
79
-
80
-
81
-
82
-
83
-
84
-
85
-
86
-
87
-
88
-
89
-
90
-
91
-
92
-
93
-
94
-
95
-
96
-
97
-
98
-
99
-
100
-
101
-
102
-
103
-
104
-
105
-
106
-
107
-
108
-
109
-
110
-
111
-
112
-
113
-
114
-
115
-
116
-
117
-
118
-
119
-
120
-
121
-
122
-
123
-
124
-
125
-
126
-
127
-
128
-
129
-
130
-
131
-
132
-
133
-
134
-
135
-
136
-
137
-
138
-
139
-
140
-
141
-
142
-
143
-
144
-
145
-
146
-
147
-
148
-
149
-
150
-
151
-
152
-
153
-
154
-
155
-
156
-
157
-
158
-
159
-
160
-
161
-
162
-
163
-
164
-
165
-
166
-
167
-
168
-
169
-
170
-
171
-
172
-
173
-
174
-
175
-
176
-
177
-
178
-
179
-
180
-
181
-
182
-
183
-
184
-
185
-
186
-
187
-
188
-
189
 |
 |
