Casio LK 210 User Guide - Page 19
Using Tone Effects, Turning the Key Light System On, and Off, Using the Microphone Jack - key lighting keyboard
 |
UPC - 079767313395
View all Casio LK 210 manuals
Add to My Manuals
Save this manual to your list of manuals |
Page 19 highlights
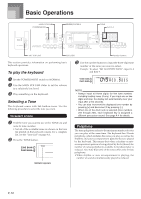
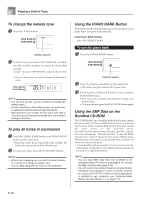
Basic Operations Using Tone Effects Reverb: Makes your notes resonate Chorus: Adds more breadth to your notes 1 Press the REVERB/CHORUS button to cycle through the effect settings as shown below. • You can find out the current effect setting by looking at the REVERB and CHORUS indicators. On On On Off Reverb on Chorus on Both on Both off 2 After turning on the effect you want, use the number buttons or the [+]/[-] buttons to select the effect type you want. • Note that you need to select an effect type with the number buttons or the [+]/[-] buttons within a few seconds after turning on an effect. If you don't, the display will exit the setting screen. Effect List Reverb 0: Room 1 1: Room 2 2: Hall 1 3: Hall 2 Chorus 0: Chorus 1 1: Chorus 2 2: Chorus 3 3: Chorus 4 Turning the Key Light System On and Off Use the following procedure when you want to turn the key light system on or off. To turn the key light system on and off 1 Press the KEY LIGHT button to toggle the key light system on and off. • The KEY LIGHT indicator disappears when the key light system is turned off. Using the Microphone Jack Connecting a commercially available microphone* to the MIC IN jack makes it possible to sing along with the keyboard's built-in tunes or with SMF playback. When connecting a microphone, be sure to first adjust the MIC VOLUME to a relatively low setting, and then adjust to the level you want after connecting. * If a microphone was included with your keyboard, use that microphone. If your keyboard did not come with a microphone, use a commercially available microphone that satisfies the stipulated specifications. 1 Set the MIC VOLUME slider setting so it is on the "MIN" side. 2 Turn on the microphone's on/off switch. 3 Use the MIC VOLUME slider to adjust microphone volume to the level you want. [Rear Panel] Microphone on/off switch Microphone MIC VOLUME slider IMPORTANT! • Be sure to use the microphone's on/off switch to turn off the microphone and to disconnect the microphone from the keyboard whenever you are not using it. NOTE • The key light system is turned on automatically whenever you turn on keyboard power. E-17
-
 1
1 -
2
-
3
-
4
-
5
-
6
-
7
-
8
-
9
-
10
-
11
-
12
-
13
-
 14
14 -
 15
15 -
 16
16 -
 17
17 -
 18
18 -
 19
19 -
 20
20 -
 21
21 -
 22
22 -
 23
23 -
 24
24 -
25
-
26
-
27
-
28
-
29
-
30
-
31
-
32
-
33
-
34
-
35
-
36
-
37
-
38
-
39
-
40
-
41
-
42
-
43
-
44
-
45
-
46
-
47
-
48
-
49
-
50
-
51
-
52
-
53
-
54
-
55
-
56
-
57
-
58
-
59
 |
 |
