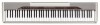
Casio PX 110 User Guide - Page 9
Assigning Different Tones to the Left, and Right Sides of the Keyboard, Using Tone Effects - used
 |
UPC - 079767361150
View all Casio PX 110 manuals
Add to My Manuals
Save this manual to your list of manuals |
Page 9 highlights
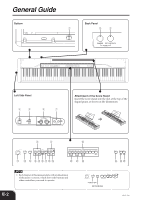
Playing with Different Tones 2 After you are finished using the layered tones, press the one of the TONE buttons again to unlayer them. Adjusting the Volume Balance between Two Layered Tones 1 While holding down the FUNCTION button, use the keyboard keys shown below to adjust the volume of the layered tones. ̇ Specifying the Keyboard Tone Split Point 1 While holding down the SPLIT button, press the keyboard key where you want the left limit of the high range (right) tone to be. Flash Left limit of the high range Low range High range ̈ L L L L L L L L C1 C2 C3 C4 C5 C6 C7 C8 Initial default (Center) £ ¥ Volume of the layered tone Volume of the main tone • To return the volume setting to its initial default, hold down the FUNCTION button and press both of the keys at the same time. Assigning Different Tones to the Left and Right Sides of the Keyboard You can assign different tones to keys on the left side and the right side of the keyboard. Split Point Low Range High Range STRINGS GRAND PIANO 2 1 Press the TONE button of the tone you want to select for the high (right) range. Example: GRAND PIANO 2 2 Press the SPLIT button. • This causes the SPLIT indicator lamp to light. 3 Press the TONE button of the tone you want to select for the low (left) range. • The keyboard is now split between the two tones. Example: STRINGS 4 After you are finished using the split keyboard, press the SPLIT button again to unsplit it. • This causes the SPLIT indicator lamp to go out. 404A-E-009A NOTE • The split point setting also controls the point where the keyboard splits between the accompaniment keyboard (pages E-12, 13) and the melody keyboard. Moving the split point also affects the sizes of the accompaniment keyboard and the melody keyboard. Using Tone Effects Reverb: Makes your notes resonate Chorus: Adds more breadth to your notes Turning Effects On and Off 1 Each press of the REVERB or CHORUS button toggles the setting as shown below. • You can determine the status of the effects by checking the REVERB and CHORUS indicator lamps. Lit On Unlit Off E-7
-
 1
1 -
2
-
3
-
 4
4 -
 5
5 -
 6
6 -
 7
7 -
 8
8 -
 9
9 -
 10
10 -
 11
11 -
 12
12 -
 13
13 -
 14
14 -
15
-
16
-
17
-
18
-
19
-
20
-
21
-
22
-
23
-
24
-
25
-
26
-
27
-
28
-
29
-
30
-
31
-
32
 |
 |
