Casio QT 6600 User Manual - Page 11
Important
 |
View all Casio QT 6600 manuals
Add to My Manuals
Save this manual to your list of manuals |
Page 11 highlights
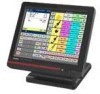
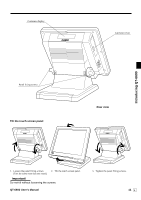
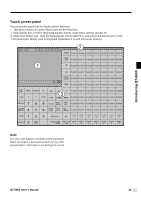
Customer display C Card slot cover Introducing QT-6600 Panel fixing screws Tilt the touch screen panel C Rear view C C C 1. Loosen the panel fixing screws. 2. Tilt the touch screen panel. (Turn the screw more than one round.) Important! Do not tilt without loosening the screws. QT-6600 User's Manual 3. Tighten the panel fixing screws. 11 E
-
 1
1 -
2
-
3
-
4
-
5
-
 6
6 -
 7
7 -
 8
8 -
 9
9 -
 10
10 -
 11
11 -
 12
12 -
 13
13 -
 14
14 -
 15
15 -
 16
16 -
17
-
18
-
19
-
20
-
21
-
22
-
23
-
24
-
25
-
26
-
27
-
28
-
29
-
30
-
31
-
32
-
33
-
34
-
35
-
36
-
37
-
38
-
39
-
40
-
41
-
42
-
43
-
44
-
45
-
46
-
47
-
48
-
49
-
50
-
51
-
52
-
53
-
54
-
55
-
56
-
57
-
58
-
59
-
60
-
61
-
62
-
63
-
64
-
65
-
66
-
67
-
68
-
69
-
70
-
71
-
72
-
73
-
74
-
75
-
76
-
77
-
78
-
79
-
80
-
81
-
82
-
83
-
84
-
85
-
86
-
87
-
88
-
89
-
90
-
91
-
92
 |
 |

Introducing QT-6600
QT-6600 User’s Manual
11
E
C
C
C
C
C
Tilt the touch screen panel
Customer display
Rear view
Panel fixing screws
1.
Loosen the panel fixing screws.
(Turn the screw more than one round.)
2.
Tilt the touch screen panel.
3.
Tighten the panel fixing screws.
Important!
Do not tilt without loosening the screws.
Card slot cover