Casio XJ-A135U User Guide
Casio XJ-A135U Manual
 |
View all Casio XJ-A135U manuals
Add to My Manuals
Save this manual to your list of manuals |
Casio XJ-A135U manual content summary:
- Casio XJ-A135U | User Guide - Page 1
PROJECTOR E XJ-A135/XJ-A145/XJ-A155/ XJ-A245/XJ-A255 Data Projector Wireless Function Guide Be sure to read the precautions in the User's Guide (Basic Operations) that comes with the Data Projector this product, the included software or this manual. CASIO COMPUTER CO., LTD. shall not be held - Casio XJ-A135U | User Guide - Page 2
Contents About This Manual 5 Terms and Conventions 5 What the Wireless Function Lets You Do 6 Projector Requirements 7 Installing Wireless Connection 3 8 Minimum System Requirements 8 Installing Wireless Connection 3 9 Installing Wireless Connection 3 on a Second and Subsequent Computers 9 - Casio XJ-A135U | User Guide - Page 3
Other Operations 28 Re-establishing a Wireless LAN Connection 28 Projector Information 28 Selecting display speed priority or resolution priority for projection 28 Terminating a Wireless LAN Connection 29 Initializing Wireless Connection 3 29 Configuring Wireless Settings 30 System Admin Page - Casio XJ-A135U | User Guide - Page 4
a computer to the projector via wireless LAN ........ 39 Installing and Removing the Wireless Adapter 40 Wireless LAN Connection Troubleshooting 42 Wireless LAN Connection between the Projector and a Computer 42 Simultaneous Wireless LAN Connections with Multiple Projectors 43 System Admin Page - Casio XJ-A135U | User Guide - Page 5
About This Manual... This manual explains how to establish a wireless LAN connection between a CASIO XJ-A135, XJ-A145, XJ-A155, XJ-A245, or XJ-A255 Data Projector and a computer, and send computer screen contents to the projector for projection. Terms and Conventions In this manual, there are many - Casio XJ-A135U | User Guide - Page 6
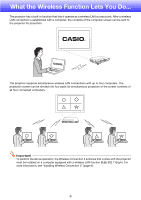
LAN connection is established with a computer, the contents of the computer screen can be sent to the projector for projection. The projector supports simultaneous wireless LAN connections with up to four computers. The projection screen can be divided into four parts for simultaneous projection - Casio XJ-A135U | User Guide - Page 7
must be installed on a computer equipped with a wireless LAN function (IEEE 802.11b/g/n). Note that the following operations are not supported. Use of a CASIO YW-2L wireless adapter or a commercially available wireless LAN adapter in the projector's USB port. Such adapters will not provide proper - Casio XJ-A135U | User Guide - Page 8
computer in order to send computer screen contents to the projector over a wireless connection for projection. Operating System : Microsoft® Windows® 7, or other pointing device (mouse or equivalent device supported by above operating systems) Wireless LAN: IEEE 802.11b/g/n Other requirements - Casio XJ-A135U | User Guide - Page 9
3 1. Place the CD-ROM that comes with the projector into your computer's CD-ROM drive. This will automatically display the CD-ROM menu screen. 2. On the menu screen, click the [Install] button to the right of "Wireless Connection 3". Follow the instructions on the dialog boxes that appear on the - Casio XJ-A135U | User Guide - Page 10
how to establish a wireless LAN connection between the projector and a computer under the projectors initial default "Wireless" settings. "Wireless" is one of the projector's built-in applications. It makes it possible to establish a wireless LAN connection between the projector and a computer, and - Casio XJ-A135U | User Guide - Page 11
" as the input source. This will enable wireless projection. The Wireless standby screen will be projected if there is no wireless LAN connection between the projector and a computer. Wireless Standby Screen The Wireless standby screen displays the information described below. Display Item - Casio XJ-A135U | User Guide - Page 12
the projector via wireless LAN connection. To start up Wireless Connection 3 Perform either of the following operations to start up Wireless Connection Programs] - [CASIO] - [Wireless Connection 3]. Important! If your computer is running Windows Vista or Windows 7, starting up Wireless Connection 3 - Casio XJ-A135U | User Guide - Page 13
16). Important! Note that only computer screen contents can be sent from your computer to the projector over a wireless LAN connection. Audio data cannot be sent. If you are running Wireless Connection 3 under Windows Vista or Windows 7, do not perform any of the operations that appear in the - Casio XJ-A135U | User Guide - Page 14
the "Set Network Location" dialog box appears, click [Cancel] to close the dialog box. A dialog box like the one shown below as soon as Wireless Connection 3 finds a projector to connect to. 5. Enter the user name and login code. The user name you enter here will be displayed as the user name on - Casio XJ-A135U | User Guide - Page 15
and subsequent computers is the same as the procedure from step 3 under "To use a default SSID to connect a computer to the projector via wireless LAN" (page 14). Note, however, that the display contents of subsequently connected computers will not appear automatically if the display contents of - Casio XJ-A135U | User Guide - Page 16
Wireless LAN Connection when Using Multiple Projectors at the Same Time When using two or more projectors in the same location (same meeting room, etc.), each one is identified by a unique SSID (service set identifier) that lets each computer keep track of which projector it is connected to. The - Casio XJ-A135U | User Guide - Page 17
use a default SSID to connect a computer to the projector via wireless LAN" (page 14), a dialog box like the one shown below will appear on the computer screen. When this happens, check the SSID on the Wireless standby screen being projected by the projector you want to connect to and click the same - Casio XJ-A135U | User Guide - Page 18
). Enter the passphrase (or WEP key). Apply (register) the above settings to the projector. (At this time the wireless LAN connection between the projector and computer will be terminated.) Click the Wireless Connection 3 [Reconnect] button. On the dialog box that appears, enter the passphrase (or - Casio XJ-A135U | User Guide - Page 19
the procedure under "To use a default SSID to connect a computer to the projector via wireless LAN" (page 14) up to step 6 to establish a wireless LAN connection between the projector and computer. 2. On a Wireless Connection 3 window, click the function menu button and then click [Admin Screen - Casio XJ-A135U | User Guide - Page 20
to System Admin page from the default. For more information, see "To change the System Admin login password" (page 32). To log out of the projector's System Admin page Click "Logout" in the upper right corner of the System Admin page. This returns to the top System Admin screen. 20 - Casio XJ-A135U | User Guide - Page 21
"_default1", "_default2", or "_default3", because these are already used for projector default SSIDs. 4. Select the security protocol. Click the [] button to protect against unauthorized access to wireless communications. Turns off wireless LAN security, so communications are not encrypted. 21 - Casio XJ-A135U | User Guide - Page 22
WEP key. Example: 11223344556677889900AABBCC No input required. The character string you input here will be required when you establish a wireless LAN connection between a projector that uses the security settings and a computer. Make sure you do not forget the character string you enter. If you - Casio XJ-A135U | User Guide - Page 23
LAN Connection after Configuring Security Settings The procedures in this section start from the point that a single projector is projecting the Wireless standby screen following configuration of security settings. They also assume that the computer was restarted after settings were configured - Casio XJ-A135U | User Guide - Page 24
need to do is click [OK] on the dialog box that appears to establish a wireless LAN connection between the projector and computer. Establishing a Wireless LAN Connection while Security is Turned Off Starting up Wireless Connection 3 on the computer when "Off" is selected for the security setting of - Casio XJ-A135U | User Guide - Page 25
LAN Connection Operations This section explains operations you can performed after a wireless LAN connection is established between the projector and a computer. Most of these operations are performed using Wireless Connection 3. Function menu button Minimize button Login code Close button - Casio XJ-A135U | User Guide - Page 26
the current projection and switch to projection from the computer where the operation was performed. At this time the wireless LAN connection is maintained between the projector and the computer whose projection was cancelled. Pausing 1-screen Projection On the computer from which you want to pause - Casio XJ-A135U | User Guide - Page 27
corner of the 4-screen projection. Note Simultaneous wireless LAN connections are supported for up to 32 computers and a single projector. Simultaneous projection of screen images is supported for up to four computers connected via wireless LAN. While 4-screen projection is being performed - Casio XJ-A135U | User Guide - Page 28
then click [Server Search] on the menu that appears. The computer will terminate the current wireless LAN connection and start searching for a projector it can connect to. Projector Information On a Wireless Connection 3 window, click the function menu button and then click [Info] on the menu that - Casio XJ-A135U | User Guide - Page 29
LAN Connection Use Wireless Connection 3 to terminate a wireless LAN connection between the projector and a computer. Click the close button in the upper right corner of the Wireless Connection 3 window. Initializing Wireless Connection 3 Performing the following procedure returns the passphrase - Casio XJ-A135U | User Guide - Page 30
settings, etc.) can be configured using the System Admin page, which can be accessed from the computer currently connected to the projector via wireless LAN. For more information, see "System Admin Page Operations and Settings" (page 32). To switch between Default SSIDs Important! This procedure - Casio XJ-A135U | User Guide - Page 31
highlighting to "Yes" and then press the [ENTER] key. This will perform initialization, which will return all Wireless settings, including settings configured with the projector's System Admin page, to their initial factory defaults. For information about the initial defaults of the System Admin - Casio XJ-A135U | User Guide - Page 32
settings (mainly security) To change the System Admin login password 1. Establish a wireless LAN connection between the projector and computer, and log in to the projector's System Admin screen from the projector. 2. Click "Change Password". This displays a screen for changing the password. 32 - Casio XJ-A135U | User Guide - Page 33
3. Enter the new password twice into the "New Password" and the "Reinput Password" input boxes. You can enter up to eight characters as the password. Note that you will need the password you enter here the next time you log in to the System Admin page. Make sure you do not forget the password - Casio XJ-A135U | User Guide - Page 34
To configure projector network settings and wireless LAN connection settings 1. Establish a wireless LAN connection between the projector and computer, and log in to the projector's System Admin screen from the projector. 2. Click "Setup" to display the System Admin page Setup screen. 3. Change a - Casio XJ-A135U | User Guide - Page 35
by this procedure. To initialize all System Admin page settings 1. Establish a wireless LAN connection between the projector and computer, and log in to the projector's System Admin screen from the projector. 2. Click "Restore Factory Defaults". This displays a screen like the one shown - Casio XJ-A135U | User Guide - Page 36
192.168.100.10 DHCP Setup Auto/Disable Specifies whether an IP address should be assigned automatically to a computer connected to the projector via wireless LAN. "Auto" causes an IP address to be assigned automatically, while "Disable" turns off auto assignment. Initial Default: Auto Starting IP - Casio XJ-A135U | User Guide - Page 37
System Admin > Change Password Setting Name New Password Reinput password Description For input of the new password when logging in to the System Admin page. Initial Default: admin 37 - Casio XJ-A135U | User Guide - Page 38
the USB memory (called a "USB Token") into the computer's USB port. Using USB tokens is recommended when connecting to the projector from multiple computers. Installing Wireless Connection 3 on USB Memory USB memory with a capacity of at least 4MB is required for installation. Use of newly formatted - Casio XJ-A135U | User Guide - Page 39
token wizard screen. To use a USB token to connect a computer to the projector via wireless LAN Connect the USB token to the computer's USB port and then double click the Wireless Connection 3 icon in the token. After Wireless Connection 3 starts up, you can perform the same operations you do when - Casio XJ-A135U | User Guide - Page 40
to the special YW-3 port located under the wireless adapter cover of the projector. Doing so can result in malfunction and other trouble with the projector and/or connected device. To install the wireless adapter on the projector 1. Turn off the projector and unplug its power cord from the power - Casio XJ-A135U | User Guide - Page 41
two screws that secure the wireless adapter cover, and then pull the top of the cover towards you to remove it. Special YW-3 port Wireless adapter YW-3 1 3. Remove the wireless adapter. Grasp the wireless adapter and move the adapter left as you pull it out. 4. Replace the cover and secure it - Casio XJ-A135U | User Guide - Page 42
Troubleshooting Check the following points whenever you are having problems with a wireless LAN connection. Wireless LAN Connection between the Projector and a Computer Problem [Reconnect] remains on the Wireless Connection 3 window and the computer won't connect to the projector. The wireless - Casio XJ-A135U | User Guide - Page 43
LAN Connections with Multiple Projectors Problem Cause and Required Action Refer to: Wireless Connection 3 is Make sure all of the projectors are turned on. A - running on my computer, projector can be recognized by a computer even if but the Projector List "Wireless" is not selected as - Casio XJ-A135U | User Guide - Page 44
System Admin page settings, to their initial factory defaults. "To initialize the Wireless setup" (page 31) Performing Wireless Operations from a Computer Problem I can't change the SSID by using the projector's Wireless setup menu. Cause and Required Action Refer to: After you use the System - Casio XJ-A135U | User Guide - Page 45
login code, check the projector's Wireless standby screen (page 11). The wrong passphrase (or WEP key) was entered when establishing a wireless LAN connection with a projector configured with security settings that appear on the projection screen, see the User's Guide (UsersGuide_English.pdf). 45 - Casio XJ-A135U | User Guide - Page 46
MA0912-A
-
 1
1 -
 2
2 -
 3
3 -
 4
4 -
 5
5 -
 6
6 -
 7
7 -
8
-
9
-
10
-
11
-
12
-
13
-
14
-
15
-
16
-
17
-
18
-
19
-
20
-
21
-
22
-
23
-
24
-
25
-
26
-
27
-
28
-
29
-
30
-
31
-
32
-
33
-
34
-
35
-
36
-
37
-
38
-
39
-
40
-
41
-
42
-
43
-
44
-
45
-
46
 |
 |

1
DATA PROJECTOR
XJ-A135/XJ-A145/XJ-A155/
XJ-A245/XJ-A255
Data Projector
Wireless Function Guide
Be sure to read the precautions in the User’s Guide (Basic Operations) that comes with the Data
Projector.
Be sure to keep all user documentation handy for future reference.
Microsoft, Windows, Windows Vista, and Aero are registered trademarks or trademarks of
Microsoft Corporation in the United States and other countries.
Other company and product names may be registered product names or trademarks of their
respective owners.
The contents of this manual are subject to change without notice.
Copying of this manual, either in part or its entirety, is forbidden. You are allowed to use this
manual for your own personal use. Any other use is forbidden without the permission of CASIO
COMPUTER CO., LTD.
CASIO COMPUTER CO., LTD. shall not be held liable for any lost profits or claims from third
parties arising out of the use of this product, the included software or this manual.
CASIO COMPUTER CO., LTD. shall not be held liable for any loss or lost profits due to loss of
data due to malfunction or maintenance of this product, or any other reason.
The sample screens shown in this manual are for illustrative purposes only, and may differ
somewhat from the screens actually produced by the product.
E