Celestron Advanced Stereo Microscope Microscope Manual (44200, 44202, 44204, 4 - Page 10
Microscope Operation
 |
View all Celestron Advanced Stereo Microscope manuals
Add to My Manuals
Save this manual to your list of manuals |
Page 10 highlights
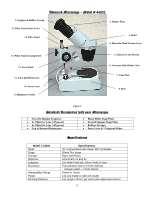
Microscope Operation Viewing a Specimen To view a slide specimen without using the electric illuminator: 1. Carefully place a specimen slide under the specimen holder clips (11) and center the slide directly in the middle of the stage plate (10). For specimen slides, you should use the black/white stage plate. 2. Illuminate the specimen slide by using a nearby desk lamp, table lamp, bright overhead light, or use natural light if located near a window. 3. To focus on your specimen slide, turn the focus knob (6) until the specimen comes into focus. If there is not enough travel in the focuser mechanism to reach focus, it may be necessary to loosen the pillar stand locking knob (5) and raise or lower the entire head assembly (14) until the image comes into sharp focus. Tip: Experiment with different lighting for different specimens. When using downward lighting, the white side of the stage may wash out fine detail whereas the black side will increase contrast but may make the specimen less bright. To view larger specimens without using the electric illuminator: 1. For larger specimens such as insects or insect parts, animal parts, rocks, fossils, PC boards, other materials, plant and flower parts, and other larger items --- you will have to make adjustments to the working space to obtain focus. 2. Make sure the binocular head (14) is high enough for the specimen to fit on the stage plate (10). You may have to raise the head (14) by loosening the pillar stand locking knob (5) and move the head up the pillar stand (3) to the desired position and then tighten the pillar stand locking knob (5). 3. Illuminate and focus the large specimen similar to items 2 and 3 in the section above. To provide higher quality viewing of specimens you will want to use the electric illuminator. Your microscope has a top illuminator and a bottom illuminator. To use the illuminators: 1. Plug one end of the power cord into the socket on the back of the microscope and the plug prong end of the power cord into a wall outlet - see Figure 3b below. Make sure you have the proper model for your power requirement - either the 115-volt model or the 230-volt model. 2. Turn the switch (located at the back of the microscope) to the on position - see Figure 3b. 3. Turn the top illuminator knob (9) on by rotating it clockwise and increase the brightness by continuing to rotate the knob to the desired intensity. 4. Turn the bottom illuminator knob (to the right of the top illuminator knob) on by rotating it clockwise. The bottom illuminator does not have an adjustment for brightness. The bottom illuminator can only be useful when using the frosted/opaque stage plate. 5. For many specimens, you should experiment with the different illumination options to get one that gives you the best results. Power Switch Socket for Power Cord Figure 3b Rotating the Binocular Head The head of your microscope can be rotated 360°. Therefore, you can view from any position. To change positions of the head, loosen the binocular head lock screw (13) and rotate the head (14) to the position desired and then tighten the binocular head tension screw (13). 10
-
 1
1 -
2
-
3
-
4
-
 5
5 -
 6
6 -
 7
7 -
 8
8 -
 9
9 -
 10
10 -
 11
11 -
 12
12 -
 13
13 -
 14
14 -
 15
15 -
16
-
17
-
18
-
19
-
20
-
21
-
22
-
23
-
24
-
25
-
26
-
27
-
28
-
29
-
30
-
31
-
32
-
33
-
34
-
35
-
36
-
37
-
38
-
39
-
40
-
41
-
42
-
43
-
44
-
45
-
46
-
47
-
48
-
49
-
50
-
51
-
52
-
53
-
54
-
55
-
56
-
57
-
58
-
59
-
60
-
61
-
62
-
63
-
64
-
65
-
66
-
67
-
68
-
69
-
70
 |
 |
