Celestron Advanced Stereo Microscope Microscope Manual (44200, 44202, 44204, 4 - Page 9
Magnification Table, Assembling Your Microscope
 |
View all Celestron Advanced Stereo Microscope manuals
Add to My Manuals
Save this manual to your list of manuals |
Page 9 highlights
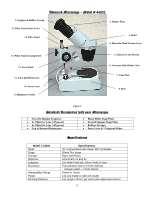
Magnification Table Objective Lens 10x Eyepieces 15x Eyepieces 2x 4x 20 Power 40 Power 30 Power 60 Power Assembling Your Microscope 1. Take the Styrofoam container out of the cardboard box. 2. Remove the tape from the Styrofoam container holding the two sections together. 3. Please note that one set of eyepieces will be on the top outer (UP) Styrofoam piece with tape over them. So make sure you remove these. 4. Carefully remove the microscope and other parts and set them on a table, desk, or other flat surface (See Figure 3a) 5. Remove the plastic bags from the stage plate (which is installed on the base) and from the binocular head (14). 6. Put the frosted stage plate (10) back into the circular hole in the base (7). 7. Remove the plastic plug cap from the bottom of the objective lens housing (12) by turning counterclockwise. 8. Make sure the pillar locking knob (5) is very tight before proceeding. 9. Back off the head lock screw (13) from the circular opening in the microscope bracket arm (see Figure 3a) so it does not protrude into the circular opening area. 10. Place the objective lens housing (12) down into the circular opening in the bracket arm and make sure it is all the way down where the head (14) rests upon the top of the bracket arm. 11. Then, tighten the head lock screw (13). 12. Make sure the bracket arm and objective lens housing (12) are parallel to the base (7). 13. Rotate the knurled ring at the top of the objective lens housing (12) counterclockwise all the way until it stops so that the 2x objective lens is facing you when looking from the front of the microscope. 14. Remove the plastic plug caps from the eyepiece tubes. 15. Install the two 10x eyepieces into the eyepiece tubes by pushing down on the eyepiece until it stops. The eyepieces are held in place by friction. 16. If you do not wear eyeglasses you install the rubber eyecups (the ones with the largest circular opening) with the lips up and facing outward. The other set of rubber eyecups are for use with the 15x eyepieces. The rubber eyecups will stop extraneous light. 17. Install the top illuminator by lowering it in the square opening in the bracket arm. Start by backing up the illuminator lock screw (4) so that it does not protrude into the opening in the bracket arm. 18. On the body of the illuminator is a threaded insert. Hold this up adjacent to the lock screw (4) and thread the lock screw (4) into the threaded insert of the illuminator until it is tight. 19. Insert the cable of the top illuminator (2) into the socket at the top of the pillar stand (3). You are now ready to use your microscope! Bracket Arm Figure 3a 9
-
 1
1 -
2
-
3
-
 4
4 -
 5
5 -
 6
6 -
 7
7 -
 8
8 -
 9
9 -
 10
10 -
 11
11 -
 12
12 -
 13
13 -
 14
14 -
15
-
16
-
17
-
18
-
19
-
20
-
21
-
22
-
23
-
24
-
25
-
26
-
27
-
28
-
29
-
30
-
31
-
32
-
33
-
34
-
35
-
36
-
37
-
38
-
39
-
40
-
41
-
42
-
43
-
44
-
45
-
46
-
47
-
48
-
49
-
50
-
51
-
52
-
53
-
54
-
55
-
56
-
57
-
58
-
59
-
60
-
61
-
62
-
63
-
64
-
65
-
66
-
67
-
68
-
69
-
70
 |
 |
