Celestron Advanced VX 700 Maksutov Cassegrain Telescope Celestron PWI Telescop - Page 19
Cordwrap AZ mounts only, Train PEC, GoTo Home, Disable Tracking
 |
View all Celestron Advanced VX 700 Maksutov Cassegrain Telescope manuals
Add to My Manuals
Save this manual to your list of manuals |
Page 19 highlights
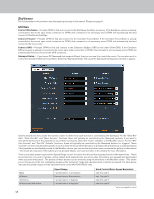
approaches from east to west, while RA negative means the mount approaches west to east. DEC positive means the mount approaches from south to north, while DEC negative means the mount approaches from north to south. For AZ mounts, azimuth positive means the mount approaches from clockwise, while azimuth negative means the mount approaches from counter-clockwise. Altitude positive means the mount approaches down to up, while altitude negative means the mount approaches up to down. This functionality allows you to minimize the effects of backlash. For example, for AZ mounts, if your telescope is back heavy from using heavy optical or photographic accessories, you would want to set your altitude approach to the negative direction. This would ensure that the telescope always approaches an object from the direction opposite the load pulling on the scope. • Cordwrap (AZ mounts only) - This function prevents the power cable from wrapping around the mount when slewing in azimuth. When "Enable Cordwrap Here" is clicked, the cordwrap position will be set at 180° away in azimuth from the current mount position. The mount will not slew past the cordwrap position in one direction, rather it will reverse direction and approach the object from "the long way around" in azimuth to prevent the power cable from wrapping around the mount. To disable the cordwrap functionality, click "Disable Cordwrap". Train PEC - Errors are inherent in all worm gears. Periodic Error Correction (PEC) improves the tracking accuracy of the RA motor drive by reducing the amplitude of your mount's particular worm gear errors. Not all Celestron mounts support PEC. Train PEC will not appear as a selection if your mount doesn't support it. Using PEC is a three-step process. First, the mount needs to find the worm gear "index position" so it has a starting point reference when playing back the recorded error. Next, you must autoguide your mount's tracking using an autoguiding camera (i.e. an "autoguider") for at least 10 minutes - about the time it takes for a full rotation of the worm gear. During this time, the mount records the corrections made by the autoguider; this is the "Train PEC" process. This "teaches" the periodic error characteristics of the worm gear to the mount. The periodic error of the worm gear drive is then stored in memory. The final step is to playback the periodic error corrections made during the training process during regular tracking. This will greatly reduce the overall tracking error in the system. PEC is intended for advanced astrophotography and will still usually require autoguiding during imaging when used. However, the autoguider will no longer need to make large amplitude tracking error corrections, ensuring pinpoint stars in the final image. To train PEC, first make sure the telescope has been accurately polar aligned. We recommend using the All-Star Polar Alignment (ASPA) functionality described earlier in this manual. Once polar aligned, follow these steps: 1. Find a bright star relatively close to the object you want to image. 2. Insert the autoguiding camera into the eyepiece holder of your telescope and connect the camera to your computer. Orient the autoguider so that one axis of the sensor is parallel to the declination axis while the other is parallel to the R.A. axis. 3. Focus the telescope so the stars in the autoguider are in sharp focus on your computer screen. 4. Connect the autoguider's guiding output port to the autoguider port on the mount's electronics panel using an ST-4 compatible autoguider cable. 5. Confirm that the autoguider is working to guide the mount. 6. To begin recording the drive's periodic error, select "Train PEC" from the Utilities section of the Menu. Click on "Begin PEC Training." The first time each observing session that PEC training or playback is selected, the worm gear must first rotate to its index position. If the worm gear rotation moves your guide star outside the field of view of the autoguider, the guide star will need to be re-centered before the recording begins. In some instances, it may be necessary to restart PEC recording after the worm gear has found its index. Do this by clicking "Cancel PEC Training" and then click on "Begin PEC Training" again. 7. After 10 minutes, PEC Training will automatically stop recording. PEC will now be active (i.e. PEC playback is now on). Click on "No, Stop training PEC" in the pop-up window to finish. If you would like to redo the PEC Training, click on "Yes, Stop PEC Playback." You can repeat the entire process; the previously recorded PEC data will be replaced with the new PEC data. You are now ready to image using PEC. If you would like to disable PEC playback, then "Configure Mount" from the Mount section of the Menu and deselect the "Enable PEC playback" box in the PEC area of the Mount Configuration window. Does the PEC function make unguided astroimaging possible? Yes and no. For shorter exposures with shorter focal length telescopes, the answer is yes. However, even with PEC, autoguiding is still mandatory for long exposure deep sky astroimaging with longer focal length telescopes. GoTo Home - For mounts that have home position sensors, like the CGX and CGX-L mounts, selecting this automatically slews the mount to the home position. Disable Tracking - Selecting this option turns off tracking. Once turned off, it will state "Stopped" in the Mount State section of the Data bar at the top of the screen. To turn tracking back on, select Enable Tracking. 17
-
 1
1 -
2
-
3
-
4
-
5
-
6
-
7
-
8
-
9
-
10
-
11
-
12
-
13
-
 14
14 -
 15
15 -
 16
16 -
 17
17 -
 18
18 -
 19
19 -
 20
20 -
 21
21
 |
 |
