Celestron SkyProdigy 130 Computerized Telescope SkyProdigy Series Manual (Engl - Page 11
StarPointer Installation, StarPointer Operation
 |
View all Celestron SkyProdigy 130 Computerized Telescope manuals
Add to My Manuals
Save this manual to your list of manuals |
Page 11 highlights
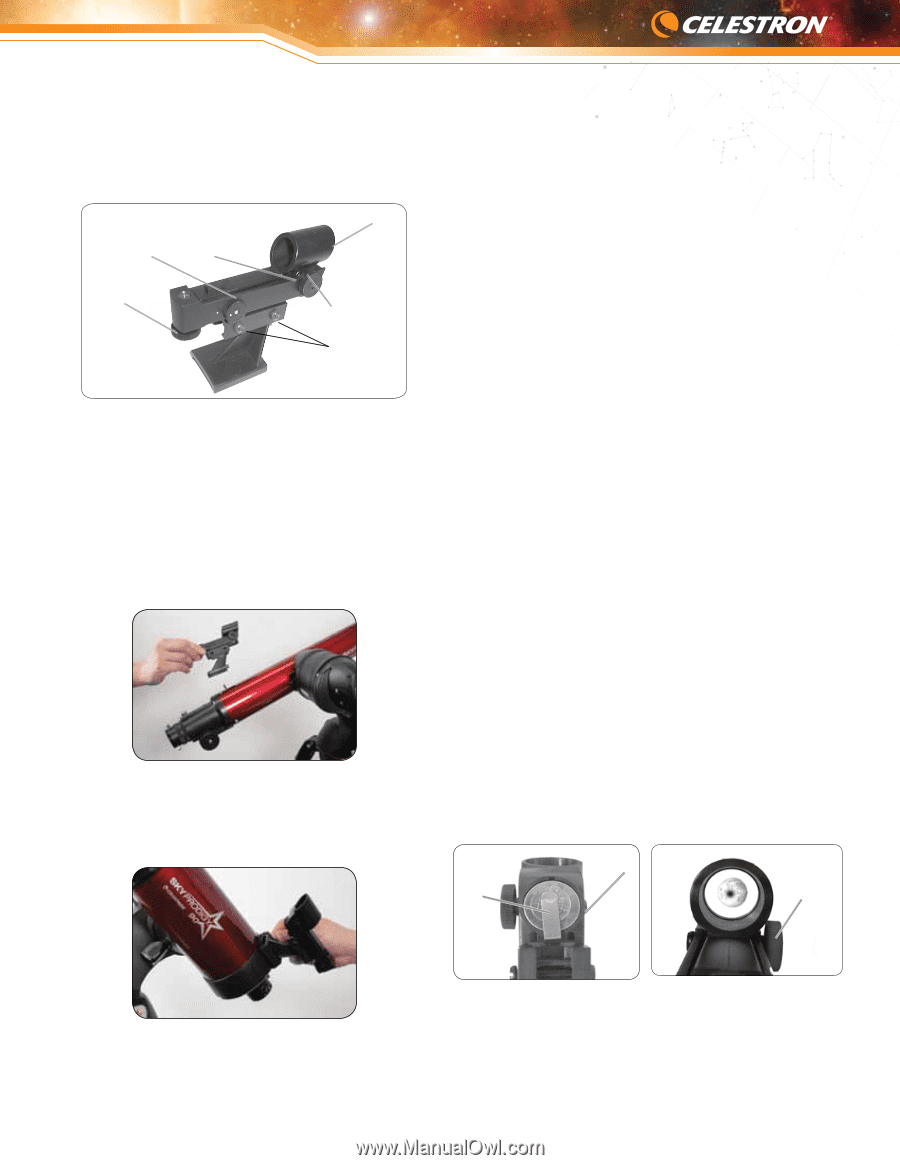
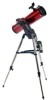
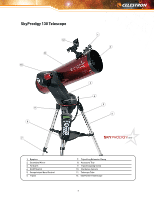
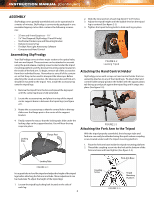
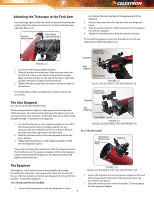
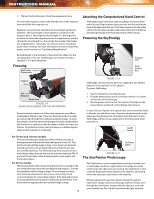
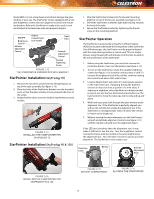
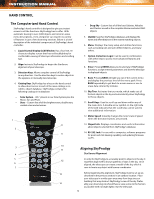
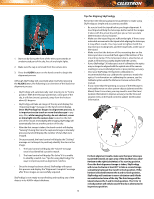
diode (LED); it is not a laser beam and will not damage the glass window or your eye. The StarPointer comes equipped with a variable brightness control, two axes alignment control and mounting brackets. Before the StarPointer is ready to be used, it must be attached to the telescope tube and properly aligned. ON/OFF Brightness Control Altitude Adjustment Control Battery Compartment (not shown) Sight Tube Azimuth Adjustment Control Dovetail Tightening Screw Figure 2-12 The StarPointer Finderscope with Bracket StarPointer Installation (SkyProdigy 70) 1. Remove the two silver screws from the threaded posts on top of the tube assembly (See figure 2-13). 2. Place the holes of the StarPointer bracket over the threaded posts so that the glass window is facing towards the front of the scope. 3. Reattached the silver screws to hold the StarPointer securely in place. 1. Slide the StarPointer bracket into the dovetail mounting platform on top of the focuser assembly (see figure 2-14). 2. Orient the StarPointer so that the sight tube is facing towards the front of the tube. 3. Secure the StarPointer bracket by tightening the thumb screw on the mounting platform. StarPointer Operation The StarPointer is powered by a long life 3v lithium battery (#CR2032) located underneath the front portion of the StarPointer. Like all finderscopes, the StarPointer must be properly aligned with the main telescope before it can be used. This is a simple process using the azimuth and altitude control knobs located on the side and bottom of the StarPointer. 1. Before using the StarPointer, you must first remove the protective plastic cover over the battery (see figure 2-15). 2. To turn on the StarPointer, rotate the variable brightness control (see figure 2-12) clockwise until you hear a "click". To increase the brightness level of the red dot, continue rotating the control knob about 180º until it stops. 3. Locate a distant object and center it in a low power eyepiece in the main telescope. If aligning during the daytime, choose an object at least a quarter of a mile away. If aligning at nighttime, select the Moon or a bright star that is easy to see. Use the four directional arrow buttons on the hand control to move the telescope side-to-side and up and down. 4. With both eyes open, look through the glass window at the alignment star. If the StarPointer is perfectly aligned, you will see the red LED dot overlap the alignment star. If the StarPointer is not aligned, take notice of where the red dot is relative to the bright star. 5. Without moving the main telescope, turn the StarPointer's azimuth and altitude alignment controls (see figure 2-12) until the red dot is directly over the alignment object. Figure 2-13 INSTALLING The StarPointer FOR SKYPRODIGY 70 StarPointer Installation (SkyProdigy 90 & 130) If the LED dot is brighter than the alignment star, it may make it difficult to see the star. Turn the brightness control counterclockwise, until the red dot is the same brightness as the alignment star. This will make it easier to get an accurate alignment. The StarPointer is now ready to use. Protective Cover Battery Azimuth Adjustment Knob Figure 2-14 INSTALLING The StarPointer FOR SKYPRODIGY 90 & 130 Figure 2-15 BATTERY COMPARTMENT Figure 2-16 Aligning the StarPointer 11
-
 1
1 -
2
-
3
-
4
-
5
-
 6
6 -
 7
7 -
 8
8 -
 9
9 -
 10
10 -
 11
11 -
 12
12 -
 13
13 -
 14
14 -
 15
15 -
 16
16 -
17
-
18
-
19
-
20
-
21
-
22
-
23
-
24
-
25
-
26
-
27
-
28
-
29
-
30
-
31
-
32
 |
 |