Celestron SkyProdigy 130 Computerized Telescope SkyProdigy Series Manual (Engl - Page 14
Warning
 |
View all Celestron SkyProdigy 130 Computerized Telescope manuals
Add to My Manuals
Save this manual to your list of manuals |
Page 14 highlights
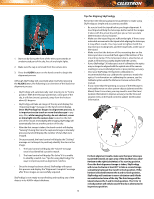
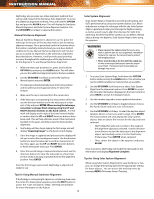
INSTRUCTION MANUAL SkyProdigy also provides two other alignment methods that can be used instead of the StarSense Auto Alignment. To access the additional alignment methods, Press and hold the OPTION Key and press the ALIGN button. This will display the StarSense Manual Alignment and Solar System Alignment options. Use the UP/DOWN Scroll keys to select either option. Manual StarSense Alignment Manual StarSense Alignment allows the user to point the telescope in the part of the sky they wish to use for taking alignment images. This is particularly useful in locations where the horizon is partially obstructed and you only have limited visibility to the sky. Manual StarSense Alignment will not give you as accurate an alignment as the automatic alignment described above. However, it will provide good pointing accuracy throughout the visible region of the sky that was used for the alignment. To use Manual StarSense Alignment: 1. With the telescope powered on, press and hold the OPTION Key and press the ALIGN button. This will allow you see the additional alignment options that are available. 2. Use the UP/DOWN Scroll keys to select the StarSense Manual option and press ENTER. 3. The telescope will automatically move to its home position and should be pointed approximately 25° above the horizon. 4. Make sure the cap is removed from the camera lens. 5. If the telescope is not pointing at a clear portion of the sky, use the direction buttons to aim the telescope at a clear part of sky and press ENTER. When moving the telescope, remember to always finish slewing using the UP and RIGHT direction buttons on the hand control. A check mark will display at the right of the hand control display to confirm that the UP and RIGHT direction buttons have been used. This will help eliminate much of the mechanical backlash in the gears and help ensure the best possible alignment. 6. SkyProdigy will then begin taking the first image and will display "Acquiring Image" on the hand control display. 7. Once the image is captured and processed, the display will ask you to select the next alignment point. Use the direction buttons to slew the telescope to another clear portion of sky. Once again, use the UP and RIGHT direction buttons to finish slewing the telescope. Press ENTER. 8. Once the second image is captured and processed, use the direction buttons to slew the telescope to a final clear portion of sky as far away as possible from the first alignment position. Press ENTER. Once the third image is processed, SkyProdigy is aligned and ready for use. Tips for Using Manual StarSense Alignment If SkyProdigy is missing bright objects or not placing them near the center of a lower power eyepiece, press the HELP button to access the "Can't see objects " utility. See Help menu feature for more information on this feature. 14 Solar System Alignment Solar System Align is designed to provide good tracking and GoTo performance by using solar system objects (Sun, Moon and planets) to align the telescope with the sky. Solar System Align is a great way to align your telescope for daytime viewing as well as a quick way to align the telescope for night time observing. Since the StarSense camera can not detect celestial objects during the daytime, Solar System Align is done using the eyepiece. Warning • Place cap over the camera lens! Since you may wish to use the Sun for your alignment, remember to place the cap over the camera lens to protect the imaging sensor. • Never look directly at the Sun with the naked eye or with a telescope (unless you have the proper solar filter). Permanent and irreversible eye damage may occur. 1. To access Solar System Align, hold down the OPTION button while pressing the ALIGN button. This will allow you see the additional alignment options that are available. 2. Use the UP/DOWN Scroll buttons to select Solar System Align from the alignment options. Press ENTER to accept the time/site information displayed on the hand control or press BACK to accept the displayed values. 3. Use the number key pad to enter updated information. 4. Use the UP/DOWN Scroll keys to toggle between choices like North/South and time zone information. 5. Use the UP/DOWN Scroll keys to select the daytime object (planets, Moon or Sun) you wish to align. Press ENTER. The hand control will only display the solar system objects that are above the horizon for the day and time selected. • SkyProdigy then asks you to center in the eyepiece the alignment object you selected. Use the direction arrow buttons to slew the telescope to the alignment object and carefully center it in the StarPointer finderscope. Press ENTER when centered. • Then, center the object in the eyepiece and press ALIGN. Once in position, SkyProdigy will model the sky based on this information and display Alignment Complete. Tips for Using Solar System Alignment When using Solar System Alignment to view the Moon or Sun, you can change the tracking speed to the appropriate setting for these objects. You can access the tracking menu by pressing: MENU>Telescope Setup>Tracking
-
 1
1 -
2
-
3
-
4
-
5
-
6
-
7
-
8
-
 9
9 -
 10
10 -
 11
11 -
 12
12 -
 13
13 -
 14
14 -
 15
15 -
 16
16 -
 17
17 -
 18
18 -
 19
19 -
20
-
21
-
22
-
23
-
24
-
25
-
26
-
27
-
28
-
29
-
30
-
31
-
32
 |
 |