Cisco 1232AG Hardware Installation Guide - Page 90
Browser TFTP Interface, Obtaining the Access Point Image File
 |
UPC - 882658058363
View all Cisco 1232AG manuals
Add to My Manuals
Save this manual to your list of manuals |
Page 90 highlights
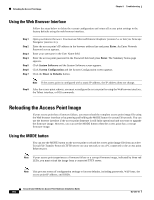
Obtaining the Access Point Image File Chapter 9 Troubleshooting Browser TFTP Interface The TFTP interface allows you to use a TFTP server on a network device to load the access point image file. Follow the instructions below to use a TFTP server: Step 1 Step 2 Step 3 Step 4 Step 5 Step 6 Step 7 Step 8 Step 9 Open your Internet browser. You must use Microsoft Internet Explorer (version 5.x or later) or Netscape Navigator (version 4.x). Enter the access point's IP address in the browser address line and press Enter. An Enter Network Password screen appears. Enter your username in the User Name field. Enter the access point password in the Password field and press Enter. The Summary Status page appears. Click the System Software tab and then click Software Upgrade. The HTTP Upgrade screen appears. Click the TFTP Upgrade tab. Enter the IP address for the TFTP server in the TFTP Server field. Enter the file name for the access point image file in the Upload New System Image Tar File field. If the file is located in a subdirectory of the TFTP server root directory, include the relative path of the TFTP server root directory with the filename. If the file is located in the TFTP root directory, enter only the filename. Click the Upload button. For additional information click the Help icon on the Software Upgrade screen. Obtaining the Access Point Image File The access point image file can be obtained from the Cisco.com software center using the following steps: Step 1 Step 2 Step 3 Step 4 Step 5 Step 6 Step 7 Step 8 Step 9 Use your Internet browser to access the Cisco Software Center at the following URL: http://www.cisco.com/public/sw-center/sw-wireless.shtml Click Option 2: Aironet Wireless Software Display Tables. Find the access point firmware and utilities section and click Cisco Aironet 1200 Series (Cisco IOS Software). Click c1100-k9w7-tar.122-11.JA.tar. On the Encryption Authorization Form, enter the requested information, read the encryption information, and check the boxes that apply. Click Submit. Read and accept the terms and conditions of the Software License Agreement. Select the image file again to download it. Download and save the image file to your hard drive and then exit the Internet browser. Cisco Aironet 1200 Series Access Point Hardware Installation Guide 9-8 OL-4310-01
-
 1
1 -
2
-
3
-
4
-
5
-
6
-
7
-
8
-
9
-
10
-
11
-
12
-
13
-
14
-
15
-
16
-
17
-
18
-
19
-
20
-
21
-
22
-
23
-
24
-
25
-
26
-
27
-
28
-
29
-
30
-
31
-
32
-
33
-
34
-
35
-
36
-
37
-
38
-
39
-
40
-
41
-
42
-
43
-
44
-
45
-
46
-
47
-
48
-
49
-
50
-
51
-
52
-
53
-
54
-
55
-
56
-
57
-
58
-
59
-
60
-
61
-
62
-
63
-
64
-
65
-
66
-
67
-
68
-
69
-
70
-
71
-
72
-
73
-
74
-
75
-
76
-
77
-
78
-
79
-
80
-
81
-
82
-
83
-
84
-
 85
85 -
 86
86 -
 87
87 -
 88
88 -
 89
89 -
 90
90 -
 91
91 -
 92
92 -
 93
93 -
 94
94 -
 95
95 -
96
-
97
-
98
-
99
-
100
-
101
-
102
-
103
-
104
-
105
-
106
-
107
-
108
-
109
-
110
-
111
-
112
-
113
-
114
-
115
-
116
-
117
-
118
-
119
-
120
-
121
-
122
-
123
-
124
-
125
-
126
-
127
-
128
 |
 |
