Cisco 1760 Hardware Installation Guide - Page 87
show version, Amounts of Memory, Cisco 1760 Router, Overview, C-3 on C-4, C-4 - motherboard
 |
UPC - 746320684857
View all Cisco 1760 manuals
Add to My Manuals
Save this manual to your list of manuals |
Page 87 highlights
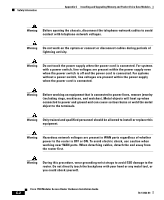
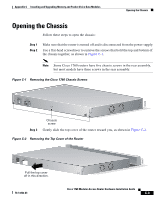
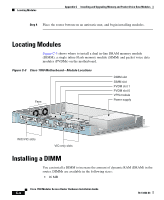
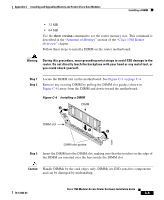
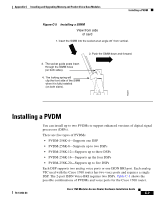
Appendix C Installing and Upgrading Memory and Packet Voice Data Modules Installing a DIMM • 32 MB • 64 MB Use the show version command to see the router memory size. This command is described in the "Amounts of Memory" section of the "Cisco 1760 Router Overview" chapter. Follow these steps to install a DIMM on the router motherboard: Warning During this procedure, wear grounding wrist straps to avoid ESD damage to the router. Do not directly touch the backplane with your hand or any metal tool, or you could shock yourself. Step 1 Step 2 Locate the DIMM slot on the motherboard. See Figure C-3 on page C-4. Remove any existing DIMM by pulling the DIMM slot guides (shown in Figure C-4) away from the DIMM and down toward the motherboard. Figure C-4 Installing a DIMM DIMM 2 DIMM slot 1 2 42289 DIMM slot guides Step 3 Insert the DIMM into the DIMM slot, making sure that the notches on the edge of the DIMM are inserted over the bars inside the DIMM slot. Caution Handle DIMMs by the card edges only. DIMMs are ESD-sensitive components and can be damaged by mishandling. 78-13342-03 Cisco 1760 Modular Access Router Hardware Installation Guide C-5
-
 1
1 -
2
-
3
-
4
-
5
-
6
-
7
-
8
-
9
-
10
-
11
-
12
-
13
-
14
-
15
-
16
-
17
-
18
-
19
-
20
-
21
-
22
-
23
-
24
-
25
-
26
-
27
-
28
-
29
-
30
-
31
-
32
-
33
-
34
-
35
-
36
-
37
-
38
-
39
-
40
-
41
-
42
-
43
-
44
-
45
-
46
-
47
-
48
-
49
-
50
-
51
-
52
-
53
-
54
-
55
-
56
-
57
-
58
-
59
-
60
-
61
-
62
-
63
-
64
-
65
-
66
-
67
-
68
-
69
-
70
-
71
-
72
-
73
-
74
-
75
-
76
-
77
-
78
-
79
-
80
-
81
-
 82
82 -
 83
83 -
 84
84 -
 85
85 -
 86
86 -
 87
87 -
 88
88 -
 89
89 -
 90
90 -
 91
91 -
 92
92 -
93
-
94
-
95
-
96
-
97
-
98
-
99
-
100
-
101
-
102
-
103
-
104
-
105
-
106
-
107
-
108
-
109
-
110
-
111
-
112
 |
 |
