Cisco 4402 Configuration Guide - Page 39
Step 3: Adding clients in IAS - how setup
 |
UPC - 882658039997
View all Cisco 4402 manuals
Add to My Manuals
Save this manual to your list of manuals |
Page 39 highlights
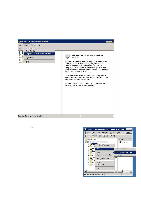
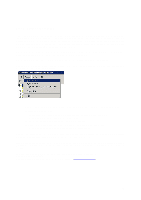
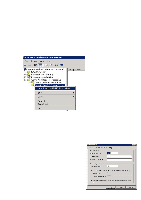
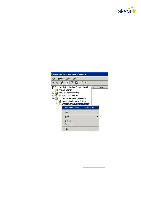
Step 3: Adding clients in IAS The clients are permitted to submit authentication requests to the RADIUS server, which the server then grants locally or forwards. For more information about the structure of eduroam, see the documentation of its infrastructure on the eduroam web page. The clients which can be added here may be access points, a control unit for wireless equipment (such as a Security Switch) or other RADIUS servers forwarding authentication requests here. NB: When a control unit, such as a Security Switch or similar, is used for a wireless network one usually only needs to add it as a client and not all the access points. Go to "Administrative Tools" on the Control Panel. Start "Internet Authentication Service" Check if IAS is running; if not, click on "Action" in the file menu and click on "Start Service" (this will be grey if the service is already running). • Right-click on "RADIUS Clients", select "New RADIUS Client", type a "Friendly Name" and IP address and click on "Next". • (Examples of Friendly Names are Accesspoint1, AP-E314, SecuritySwitch, SchoolRADIUS: select one which is descriptive!) • As the "Client-Vendor" one can select "RADIUS Standard" • The Shared Secret must be the same in both the client and in the IAS setup. o A different Shared Secret must be used for each client Repeat this process until all the clients have been added, remembering that other RADIUS servers which the forward authentication request shall also be added as clients. If this is the central RADIUS server which is to be connected to eduroam, the core must also be added. To add the eduroam core, follow the same procedure as when adding clients but with the following settings: IP address: 128.39.2.22 (hegre.uninett.no) 158.38.0.184 (trane.uninett.no) Friendly Name: eduroam Shared Secret: If you have not received this, contact [email protected]. 39
-
 1
1 -
2
-
3
-
4
-
5
-
6
-
7
-
8
-
9
-
10
-
11
-
12
-
13
-
14
-
15
-
16
-
17
-
18
-
19
-
20
-
21
-
22
-
23
-
24
-
25
-
26
-
27
-
28
-
29
-
30
-
31
-
32
-
33
-
 34
34 -
 35
35 -
 36
36 -
 37
37 -
 38
38 -
 39
39 -
 40
40 -
 41
41 -
 42
42 -
 43
43 -
 44
44 -
45
-
46
-
47
-
48
-
49
-
50
-
51
-
52
-
53
-
54
-
55
-
56
-
57
-
58
-
59
-
60
 |
 |
