Cisco HGA9N Administration Guide - Page 15
Antenna Cable, Exterior Access Point, The Antenna Pattern for, Radio Waves
 |
UPC - 745883577392
View all Cisco HGA9N manuals
Add to My Manuals
Save this manual to your list of manuals |
Page 15 highlights
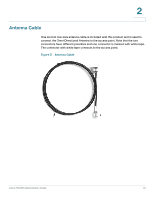
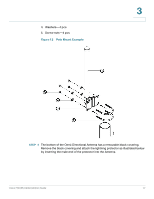
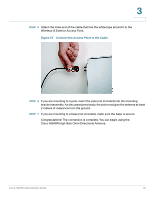
3 Figure 9 Antenna Cable Figure 10 Exterior Access Point STEP 2 Obtain a location for the 9dBi Omni-Directional Antenna. The location should have a clear view to the peer Antenna. For detailed information about adjusting the 9dBi Omni-Directional Antenna for your application, see "The Antenna Pattern for Radio Waves" on page 5 . STEP 3 Determine whether you will mount the Omni-Directional Antenna to a pole or a wall. Follow the mounting instructions as displayed. Wall Mounting Your wall mounting package should contain the following items. Items are numbered to correspond with the wall mount example in Figure 11. 1. Omni-Directional Antenna-1 pc 2. Sticker-2 pcs Cisco HGA9N Administration Guide 15
-
 1
1 -
2
-
3
-
4
-
5
-
6
-
7
-
8
-
9
-
 10
10 -
 11
11 -
 12
12 -
 13
13 -
 14
14 -
 15
15 -
 16
16 -
 17
17 -
 18
18 -
 19
19 -
 20
20 -
21
-
22
 |
 |

Cisco HGA9N Administration Guide
15
3
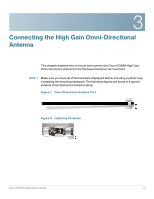
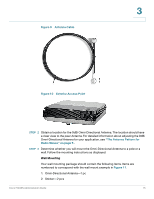
Figure 9
Antenna Cable
Figure 10
Exterior Access Point
STEP
2
Obtain a location for the 9dBi Omni-Directional Antenna. The location should have
a clear view to the peer Antenna. For detailed information about adjusting the 9dBi
Omni-Directional Antenna for your application, see
“The Antenna Pattern for
Radio Waves” on page 5
.
STEP
3
Determine whether you will mount the Omni-Directional Antenna to a pole or a
wall. Follow the mounting instructions as displayed.
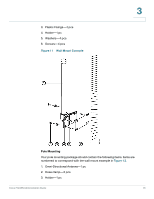
Wall Mounting
Your wall mounting package should contain the following items. Items are
numbered to correspond with the wall mount example in
Figure 11
.
1.
Omni-Directional Antenna—1 pc
2.
Sticker—2 pcs