Cisco PIX 501 Quick Start Guide - Page 9
Step 1, which indicates - pdm
 |
UPC - 746320551470
View all Cisco PIX 501 manuals
Add to My Manuals
Save this manual to your list of manuals |
Page 9 highlights
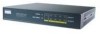
PDM version 2.0 and higher releases include a Startup Wizard for initial configuration. Follow these steps to load PDM and use the Startup Wizard: Step 1 Step 2 Use an Ethernet cable to connect your PC to one of the four switched inside ports (numbered 1 through 4) on the rear panel of the PIX Firewall. Configure your PC to use DHCP (to receive an IP address automatically from the PIX Firewall) or assign a static IP address to your PC by selecting an address out of the 192.168.1.0 network. Note The inside interface of the PIX Firewall is assigned 192.168.1.1, so choose a different IP address. Step 3 Step 4 Check the LINK LED to verify that your PC has basic connectivity to the PIX Firewall on one of the inside ports (1 through 4). When connectivity occurs, the LINK LED on the front panel of the PIX Firewall lights up solid green. To access the Startup Wizard, use a PC connected to one of the PIX Firewall switch ports and enter the URL https://192.168.1.1/startup.html into your browser. Note It is very important to enter the "s" in "https://192.168.1.1," which indicates a secure connection. If you enter "http://192.168.1.1" without the "s" in "https," you cannot access the PIX Firewall. Step 5 Accept the certificates and follow the instructions in the Startup Wizard. For online help, click the Help button at the bottom of the Startup Wizard window. 9
-
 1
1 -
2
-
3
-
 4
4 -
 5
5 -
 6
6 -
 7
7 -
 8
8 -
 9
9 -
 10
10 -
 11
11 -
 12
12 -
 13
13 -
 14
14 -
15
-
16
-
17
-
18
-
19
-
20
 |
 |
