Cisco SPA501 User Guide - Page 70
Block ANC, Setting, DND Setting, Dial Assistance, Preferred Audio, Device, Time Format, Date Format - spa501g headset
 |
View all Cisco SPA501 manuals
Add to My Manuals
Save this manual to your list of manuals |
Page 70 highlights
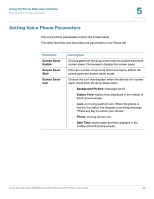
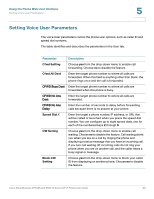
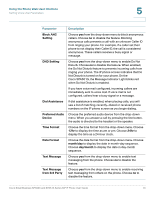
Using the Phone Web User Interface Setting Voice User Parameters 5 Parameter Block ANC Setting DND Setting Dial Assistance Preferred Audio Device Time Format Date Format Text Message Text Message from 3rd Party Description Choose yes from the drop-down menu to block anonymous callers. Choose no to disable the feature. Blocking anonymous calls prevents a call with an unknown Caller ID from ringing your phone. For example, if a caller set their phone to not display their Caller ID, the call is considered anonymous. These callers receive a busy signal or message. Choose yes from the drop-down menu to enable Do Not Disturb. Choose no to disable the feature. When enabled, the Do Not Disturb feature to prevents incoming calls from ringing your phone. The IP phone screen indicates that Do Not Disturb is turned on for your phone. On the Cisco SPA501G, the Message Indicator Light blinks red when Do Not Disturb is enabled. If you have voice mail configured, incoming callers are immediately sent to voice mail. If voice mail is not configured, callers hear a busy signal or a message. If dial assistance is enabled, when placing calls, you will see a list of matching, recently-dialed or received phone numbers on the IP phone screen as you begin dialing. Choose the preferred audio device from the drop-down menu. When you answer a call by pressing the line button, the audio is directed to the headset or the speaker. Choose the time format from the drop-down menu. Choose 12hr to display the time as am or pm. Choose 24hr to display the time as a 24-hour clock. Choose the date format from the drop-down menu. Choose month/day to display the date in month-day sequence. Choose day/month to display the date in day-month sequence. Choose yes from the drop-down menu to enable text messaging from the phone. Choose no to disable the feature. Choose yes from the drop-down menu to enable receiving text messaging from others on the phone. Choose no to disable the feature. Cisco Small Business SPA50X and SPA51X Series SIP IP Phone User Guide 70
-
 1
1 -
2
-
3
-
4
-
5
-
6
-
7
-
8
-
9
-
10
-
11
-
12
-
13
-
14
-
15
-
16
-
17
-
18
-
19
-
20
-
21
-
22
-
23
-
24
-
25
-
26
-
27
-
28
-
29
-
30
-
31
-
32
-
33
-
34
-
35
-
36
-
37
-
38
-
39
-
40
-
41
-
42
-
43
-
44
-
45
-
46
-
47
-
48
-
49
-
50
-
51
-
52
-
53
-
54
-
55
-
56
-
57
-
58
-
59
-
60
-
61
-
62
-
63
-
64
-
 65
65 -
 66
66 -
 67
67 -
 68
68 -
 69
69 -
 70
70 -
 71
71 -
 72
72 -
 73
73 -
 74
74 -
 75
75 -
76
 |
 |
