Cisco WS-C3750G-24TS-S1U Getting Started Guide - Page 21
Install the XENPAK Module and Connect to the Ports, Step 1 - catalyst switch
 |
UPC - 746320953410
View all Cisco WS-C3750G-24TS-S1U manuals
Add to My Manuals
Save this manual to your list of manuals |
Page 21 highlights
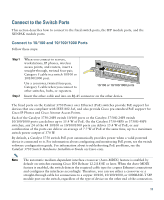
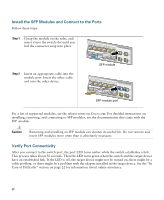
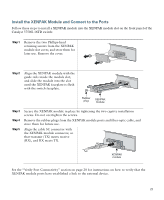
Install the XENPAK Module and Connect to the Ports Follow these steps to install a XENPAK module into the XENPAK module slot on the front panel of the Catalyst 3750G-16TD switch: Step 1 Remove the two Phillips-head retaining screws from the XENPAK module slot cover, and store them for later use. Remove the cover. Catalyst 3750 series 1 Step 2 Align the XENPAK module with the guide rails inside the module slot, and slide the module into the slot until the XENPAK faceplate is flush with the switch faceplate. TX RX Catalyst 3750 series 1 Rubber plug XENPAK module Step 3 Step 4 Step 5 Secure the XENPAK module in place by tightening the two captive installation screws. Do not overtighten the screws. Remove the rubber plugs from the XENPAK module ports and fiber-optic cable, and store them for future use. Align the cable SC connector with the XENPAK module connector, so that transmit (TX) meets receive (RX), and RX meets TX. 1 TX RX Catalyst 3750 series XENPAK module See the "Verify Port Connectivity" section on page 20 for instructions on how to verify that the XENPAK module ports have established a link to the external device. 21
-
 1
1 -
2
-
3
-
4
-
5
-
6
-
7
-
8
-
9
-
10
-
11
-
12
-
13
-
14
-
15
-
 16
16 -
 17
17 -
 18
18 -
 19
19 -
 20
20 -
 21
21 -
 22
22 -
 23
23 -
 24
24 -
 25
25 -
 26
26
 |
 |
