Cisco WS-C3750G-24TS-S1U Getting Started Guide - Page 8
Refreshing the PC IP Address, 4 Managing the Switch, Using the Device Manager - s switch
 |
UPC - 746320953410
View all Cisco WS-C3750G-24TS-S1U manuals
Add to My Manuals
Save this manual to your list of manuals |
Page 8 highlights
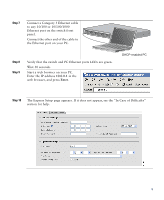
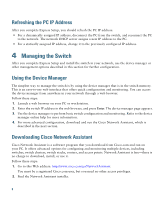
Refreshing the PC IP Address After you complete Express Setup, you should refresh the PC IP address: • For a dynamically assigned IP address, disconnect the PC from the switch, and reconnect the PC to the network. The network DHCP server assigns a new IP address to the PC. • For a statically assigned IP address, change it to the previously configured IP address. 4 Managing the Switch After you complete Express Setup and install the switch in your network, use the device manager or other management options described in this section for further configuration. Using the Device Manager The simplest way to manage the switch is by using the device manager that is in the switch memory. This is an easy-to-use web interface that offers quick configuration and monitoring. You can access the device manager from anywhere in your network through a web browser. Follow these steps: 1. Launch a web browser on your PC or workstation. 2. Enter the switch IP address in the web browser, and press Enter. The device manager page appears. 3. Use the device manager to perform basic switch configuration and monitoring. Refer to the device manager online help for more information. 4. For more advanced configuration, download and run the Cisco Network Assistant, which is described in the next section. Downloading Cisco Network Assistant Cisco Network Assistant is a software program that you download from Cisco.com and run on your PC. It offers advanced options for configuring and monitoring multiple devices, including switches, switch clusters, switch stacks, routers, and access points. Network Assistant is free-there is no charge to download, install, or use it. Follow these steps: 1. Go to this Web address: http://www.cisco.com/go/NetworkAssistant. You must be a registered Cisco.com user, but you need no other access privileges. 2. Find the Network Assistant installer. 8
-
 1
1 -
2
-
 3
3 -
 4
4 -
 5
5 -
 6
6 -
 7
7 -
 8
8 -
 9
9 -
 10
10 -
 11
11 -
 12
12 -
 13
13 -
14
-
15
-
16
-
17
-
18
-
19
-
20
-
21
-
22
-
23
-
24
-
25
-
26
 |
 |