Cobra CPI 1090 CPI 1090 - English - Page 7
Connecting Cables
 |
View all Cobra CPI 1090 manuals
Add to My Manuals
Save this manual to your list of manuals |
Page 7 highlights
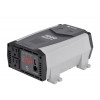
Intro Operation Customer Assistance Warranty Installation Connecting Cables ConnecIntstianllagtionCables (incluNdoteesd) • Power Secondary Icons wire and wiring are very important to the performance of the inverter. Because the inverter has a low voltage, high current input, low resistance wiring is essential between the battery and inverter. This is so it can deliver the maximum amount of energy to the load. Notice Caution Warning Keep the cable length as short as possible, no more than four feet (one and a half meters). This will keep the voltage drop to a minimum. If the cable has too much voltage drop, the inverter may shut down whenMdainrIacowns ing higher currents because voltage at the inverter may drop below 10 volts. If you must use longer cables, choose thicker cables, such as #2 AWG, and trim the ends of the cable to fit the terminals. To connect the cables between the inverter and the batteInrtyro: Operation Customer Assistance Warranty 1. Press the Power Button on the inverter to the off position. If the power source is a DC power supply, switch it off as well. Installation Notes Power Button Secondary Icons Intro Operation Customer Assistance Warranty Installation Connecting Cables Installation Notes Secondary2I.conCs onnect cable to the Power Input Terminals on input end of the inverter. The red terminal is positive (+) and the black terminal is negative (-). Insert the bare ends of the cables into the terminals and tighten the screws to clamp the wires securely. Notice Caution Warning It is a good idea to check and tighten these screws from time to time. They can become loose by vibrations or thermal cycling. Connect Cables 3. Connect cables to the power source: a. Connect the cable from the Negative (Black) Terminal of inverter to the Negative Terminal of the power source. Make a secure connection. Notice Caution Warning 8 Nothing Comes Close to a Cobra™ 9
-
 1
1 -
 2
2 -
 3
3 -
 4
4 -
 5
5 -
 6
6 -
 7
7 -
 8
8 -
 9
9 -
 10
10 -
 11
11 -
 12
12 -
13
-
14
-
15
 |
 |
