Compaq Presario 1800 Presario Select 1800 Series Maintenance and Service Guide - Page 61
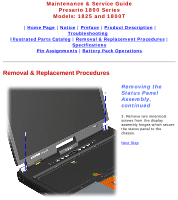
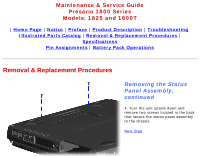
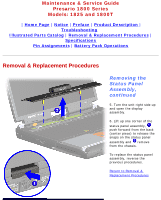
Removing the Status, Panel Assembly, continued
 |
View all Compaq Presario 1800 manuals
Add to My Manuals
Save this manual to your list of manuals |
Page 61 highlights
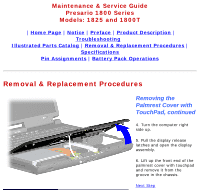
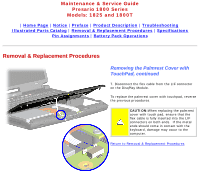
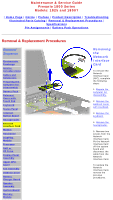
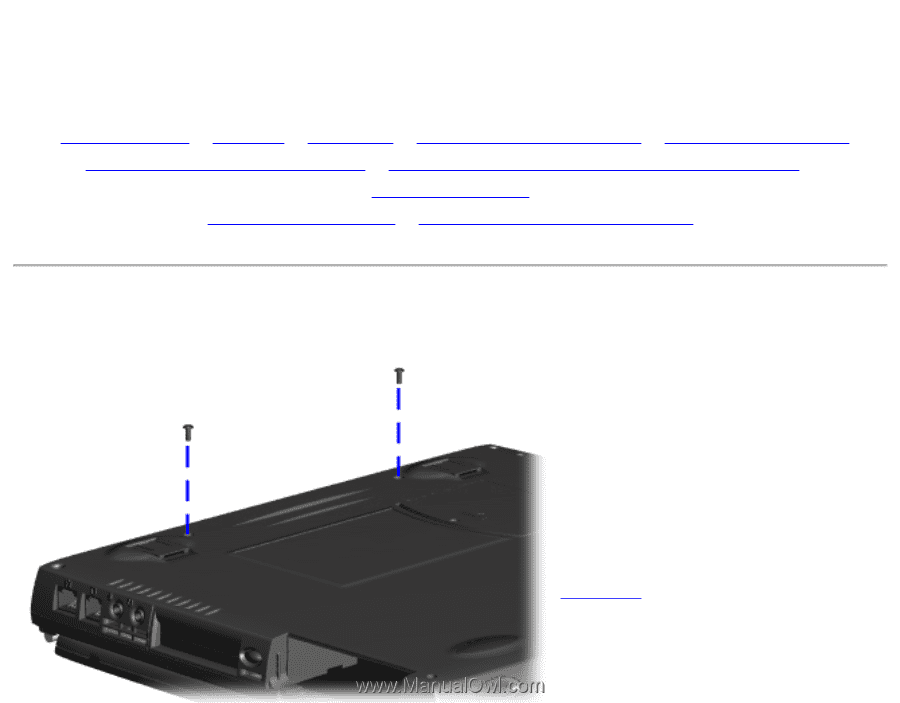
Maintenance & Service Guide Presario 1800 Series Models: 1825 and 1800T | Home Page | Notice | Preface | Product Description | Troubleshooting Illustrated Parts Catalog | Removal & Replacement Procedures | Specifications Pin Assignments | Battery Pack Operations Removal & Replacement Procedures Removing the Status Panel Assembly, continued 4. Turn the unit upside down and remove two screws located in the back that secure the status panel assembly to the chassis. Next Step
-
 1
1 -
2
-
3
-
4
-
5
-
6
-
7
-
8
-
9
-
10
-
11
-
12
-
13
-
14
-
15
-
16
-
17
-
18
-
19
-
20
-
21
-
22
-
23
-
24
-
25
-
26
-
27
-
28
-
29
-
30
-
31
-
32
-
33
-
34
-
35
-
36
-
37
-
38
-
39
-
40
-
41
-
42
-
43
-
44
-
45
-
46
-
47
-
48
-
49
-
50
-
51
-
52
-
53
-
54
-
55
-
 56
56 -
 57
57 -
 58
58 -
 59
59 -
 60
60 -
 61
61 -
 62
62 -
 63
63 -
 64
64 -
 65
65 -
 66
66 -
67
-
68
-
69
-
70
-
71
-
72
-
73
-
74
-
75
-
76
-
77
-
78
-
79
-
80
-
81
-
82
-
83
-
84
-
85
-
86
-
87
-
88
-
89
-
90
-
91
-
92
 |
 |
Maintenance & Service Guide
Presario 1800 Series
Models: 1825 and 1800T
|
Home Page
|
Notice
|
Preface
|
Product Description
|
Troubleshooting
Illustrated Parts Catalog
|
Removal & Replacement Procedures
|
Specifications
Pin Assignments
|
Battery Pack Operations
Removal & Replacement Procedures
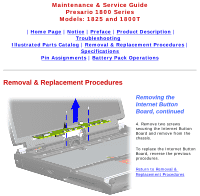
Removing the Status
Panel Assembly,
continued
4. Turn the unit upside down and
remove two screws located in the back
that secure the status panel assembly
to the chassis.
Next Step