Compaq Presario CQ42-100 Compaq Presario CQ42 Notebook PC and HP G42 Notebook - Page 83
microphone and cable is included in the display cable kit, spare part number 592151-001
 |
View all Compaq Presario CQ42-100 manuals
Add to My Manuals
Save this manual to your list of manuals |
Page 83 highlights
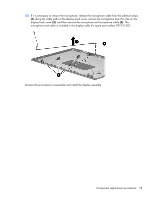
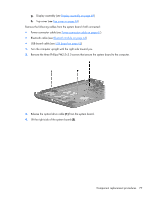
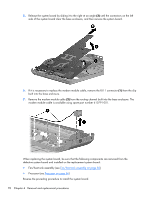
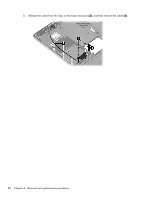
22. If it is necessary to remove the microphone, release the microphone cable from the adhesive strips (1) along the cable path on the display back cover, remove the microphone from the clips on the display back cover (2), and then remove the microphone and microphone cable (3). The microphone and cable is included in the display cable kit, spare part number 592151-001, Reverse this procedure to reassemble and install the display assembly. Component replacement procedures 75
-
 1
1 -
2
-
3
-
4
-
5
-
6
-
7
-
8
-
9
-
10
-
11
-
12
-
13
-
14
-
15
-
16
-
17
-
18
-
19
-
20
-
21
-
22
-
23
-
24
-
25
-
26
-
27
-
28
-
29
-
30
-
31
-
32
-
33
-
34
-
35
-
36
-
37
-
38
-
39
-
40
-
41
-
42
-
43
-
44
-
45
-
46
-
47
-
48
-
49
-
50
-
51
-
52
-
53
-
54
-
55
-
56
-
57
-
58
-
59
-
60
-
61
-
62
-
63
-
64
-
65
-
66
-
67
-
68
-
69
-
70
-
71
-
72
-
73
-
74
-
75
-
76
-
77
-
 78
78 -
 79
79 -
 80
80 -
 81
81 -
 82
82 -
 83
83 -
 84
84 -
 85
85 -
 86
86 -
 87
87 -
 88
88 -
89
-
90
-
91
-
92
-
93
-
94
-
95
-
96
-
97
-
98
-
99
-
100
-
101
-
102
-
103
-
104
-
105
-
106
-
107
-
108
-
109
-
110
-
111
-
112
-
113
-
114
-
115
-
116
-
117
-
118
-
119
-
120
-
121
-
122
-
123
-
124
-
125
-
126
-
127
-
128
-
129
-
130
-
131
-
132
-
133
-
134
-
135
-
136
-
137
-
138
 |
 |

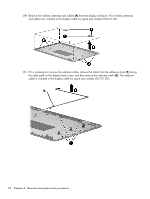
22.
If it is necessary to remove the microphone, release the microphone cable from the adhesive strips
(1)
along the cable path on the display back cover, remove the microphone from the clips on the
display back cover
(2)
, and then remove the microphone and microphone cable
(3)
. The
microphone and cable is included in the display cable kit, spare part number 592151-001,
Reverse this procedure to reassemble and install the display assembly.
Component replacement procedures
75