Craftsman 35182 Operation Manual - Page 15
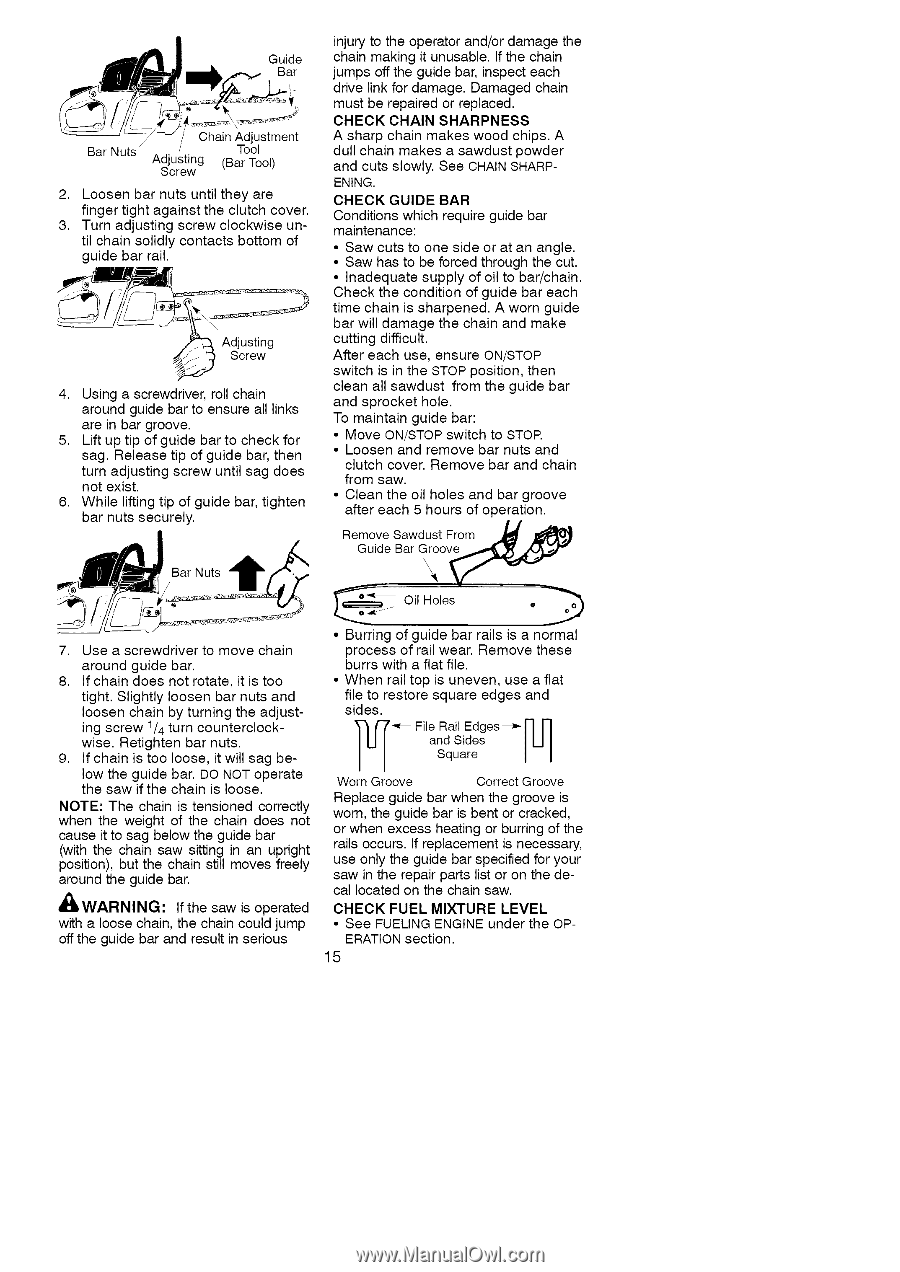
Guide, Chain Adjustment, Adjusting, Bar Tool, Screw, Bar Nuts
 |
View all Craftsman 35182 manuals
Add to My Manuals
Save this manual to your list of manuals |
Page 15 highlights
Guide Bar / Bar Nuts / Chain Adjustment Tool AdSjucrsetiwng (Bar Tool) 2. Loosen bar nuts until they are finger tight against the clutch cover. 3. Turn adjusting screw clockwise until chain solidly contacts bottom of guide bar rail. 4. Using a screwdriver, roll chain around guide bar to ensure all links are in bar groove. 5. Lift up tip of guide bar to check for sag. Release tip of guide bar, then turn adjusting screw until sag does not exist. 6. While lifting tip of guide bar, tighten bar nuts securely. injury to the operator and/or damage the chain making it unusable. If the chain jumps off the guide bar, inspect each drive link for damage. Damaged chain must be repaired or replaced. CHECK CHAIN SHARPNESS A sharp chain makes wood chips. A dull chain makes a sawdust powder and cuts slowly. See CHAIN SHARPENING. CHECK GUIDE BAR Conditions which require guide bar maintenance: • Saw cuts to one side or at an angle. • Saw has to be forced through the cut. • Inadequate supply of oil to bar/chain. Check the condition of guide bar each time chain is sharpened. A worn guide bar will damage the chain and make cutting difficult. After each use, ensure ON/STOP switch is in the STOP position, then clean all sawdust from the guide bar and sprocket hole. To maintain guide bar: • Move ON/STOP switch to STOP. • Loosen and remove bar nuts and clutch cover. Remove bar and chain from saw. • Clean the oil holes and bar groove after each 5 hours of operation. Remove Sawdust From .__ Bar Nuts Guide Bar G:ev__" 7. Use a screwdriver to move chain around guide bar. 8. If chain does not rotate, it is too tight. Slightly loosen bar nuts and loosen chain by turning the adjusting screw 1/4 turn counterclockwise. Retighten bar nuts. 9. If chain is too loose, it will sag below the guide bar. DO NOT operate the saw if the chain is loose. NOTE: The chain is tensioned correctly when the weight of the chain does not cause it to sag below the guide bar (with the chain saw sitting in an upright position), but the chain still moves freely around the guide bar. _WARNING: If the saw is operated with a loose chain, the chain could jump off the guide bar and result in serious Oil Holes o • Burring of guide bar rails is a normal process of rail wear. Remove these burrs with a flat file. • When rail top is uneven, use a flat file to restore square edges and sides. I"1 _('7 _ File Rail Edges_r] 17 and Sides IU I Square II Worn Groove Correct Groove Replace guide bar when the groove is worn, the guide bar is bent or cracked, or when excess heating or burring of the rails occurs. If replacement is necessary, use only the guide bar specified for your saw in the repair parts list or on the decal located on the chain saw. CHECK FUEL MIXTURE LEVEL • See FUELING ENGINE under the OP- ERATION section. 15
-
 1
1 -
2
-
3
-
4
-
5
-
6
-
7
-
8
-
9
-
 10
10 -
 11
11 -
 12
12 -
 13
13 -
 14
14 -
 15
15 -
 16
16 -
 17
17 -
 18
18 -
 19
19 -
 20
20 -
21
-
22
-
23
-
24
 |
 |