Craftsman 88690 Operation Manual - Page 11
knob.See
 |
View all Craftsman 88690 manuals
Add to My Manuals
Save this manual to your list of manuals |
Page 11 highlights
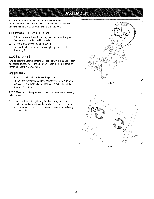
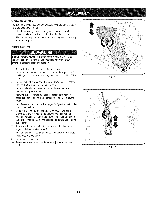
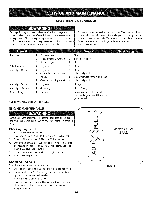
Chute Assembly Thedistancesnowis throwncan be adjustedby changingthe angle of the chuteassembly.Todo so: 1. Stopthe engineby removingthe ignitionkeyand loosenthe plasticwingknobfoundon the left sideof the chuteassembly. 2. Pivotthe chute upwardor downwardbeforeretighteningthewing knob.See Figure8. Auger Control Priorto operatingyour snowthrower,carefullyreadand followall instructionsbelow. Performall adjustmentsto verifyyour snow throweris operatingsafelyand properly. Checktheadjustmentof the augercontrolas follows: 1. Whentheauger controlis releasedand in the disengaged"up" position,the cableshouldhavevery little slack. It shouldNOTbe tight. 2. In a well-ventilatedarea,start the snowthrowerengine.Referto Startingthe Enginein the Operationsection. 3. Whilestandingin the operator'sposition(behindthe snow thrower),engagethe auger. 4. Allowtheauger to remainengagedfor approximatelyten (10) secondsbeforereleasingthe augercontrol.Repeatthis several times. 5. With theauger controlin thedisengaged"up" position,walkto the front of the machine. 6. Confirmthat the augerhas completelystoppedrotatingand showsNOsigns of motion.If the augershowsANYsignsof rotating,immediatelyreturnto the operator'spositionand shutoff the engine.Waitfor ALL movingparts to stop beforeadjustingthe augercontrol. 7. Toreadjustthecontrolcable, loosentheupper hexbolt on the augercablebracket.See Figure9. 8. Positionthe bracketupwardto providemoreslack(or downward to increasecabletension). 9. Retightenthe upperhex bolt. 10. Repeatsteps2-6 aboveto verifyproperadjustmenthasbeen achieved. Figure8 Figure9 11
-
 1
1 -
2
-
3
-
4
-
5
-
 6
6 -
 7
7 -
 8
8 -
 9
9 -
 10
10 -
 11
11 -
 12
12 -
 13
13 -
 14
14 -
 15
15 -
 16
16 -
17
-
18
-
19
-
20
-
21
-
22
-
23
-
24
-
25
-
26
-
27
-
28
-
29
-
30
-
31
-
32
-
33
-
34
-
35
-
36
-
37
-
38
-
39
-
40
-
41
-
42
-
43
-
44
-
45
-
46
-
47
-
48
-
49
-
50
-
51
-
52
-
53
-
54
-
55
-
56
-
57
-
58
-
59
-
60
-
61
-
62
-
63
-
64
-
65
-
66
-
67
-
68
-
69
-
70
-
71
-
72
 |
 |
