Crucial SK01 User Guide - Page 6
the rounded grooves on both sides
 |
UPC - 649528739414
View all Crucial SK01 manuals
Add to My Manuals
Save this manual to your list of manuals |
Page 6 highlights
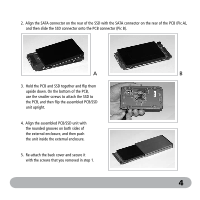
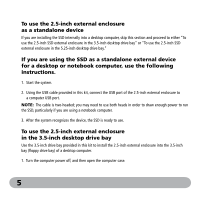
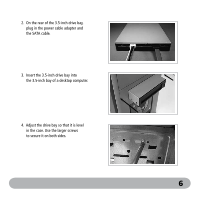
2. Align the SATA connector on the rear of the SSD with the SATA connector on the rear of the PCB (Pic A), and then slide the SSD connector onto the PCB connector (Pic B). A B 3. Hold the PCB and SSD together and flip them upside down. On the bottom of the PCB, use the smaller screws to attach the SSD to the PCB, and then flip the assembled PCB/SSD unit upright. 4. Align the assembled PCB/SSD unit with the rounded grooves on both sides of the external enclosure, and then push the unit inside the external enclosure. 5. Re-attach the back cover and secure it with the screws that you removed in step 1. 4
-
 1
1 -
 2
2 -
 3
3 -
 4
4 -
 5
5 -
 6
6 -
 7
7 -
 8
8 -
 9
9 -
 10
10 -
 11
11 -
 12
12 -
13
-
14
-
15
-
16
-
17
-
18
-
19
-
20
-
21
-
22
-
23
-
24
-
25
 |
 |

4
2.
Align the SATA connector on the rear of the SSD with the SATA connector on the rear of the PCB (Pic A),
and then slide the SSD connector onto the PCB connector (Pic B).
3.
Hold the PCB and SSD together and flip them
upside down. On the bottom of the PCB,
use the smaller screws to attach the SSD to
the PCB, and then flip the assembled PCB/SSD
unit upright.
4.
Align the assembled PCB/SSD unit with
the rounded grooves on both sides of
the external enclosure, and then push
the unit inside the external enclosure.
5.
Re-attach the back cover and secure it
with the screws that you removed in step 1.
A
B