Cub Cadet SC 500 ez SC 500 ez Operator's Manual - Page 17
Service
 |
View all Cub Cadet SC 500 ez manuals
Add to My Manuals
Save this manual to your list of manuals |
Page 17 highlights
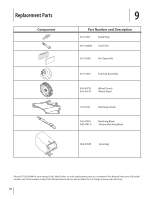
Service 7 Blade Care WARNING: When removing the cutting blade for sharpening or replacement, protect your hands with a pair of heavy gloves or use a heavy rag to hold the blade. Periodically inspect the blade adapter for cracks, especially if you strike a foreign object. Replace when necessary. Follow the steps below for blade service. 1. Disconnect spark plug boot from spark plug. Turn mower on its side making sure that the air filter and the carburetor are facing up. 2. Remove the bolt and the blade bell support which hold the blade and the blade adapter to the engine crankshaft. See Figure 7-1. Blade Adapter WARNING: An unbalanced blade will cause excessive vibration when rotating at high speeds. It may cause damage to mower and could break causing personal injury. 5. Place the blade on the adapter such that the side of the blade marked "Bottom" (or with part number) faces the ground when the mower is in the operating position. Make sure that the blade is aligned and seated on the blade adapter flanges. See Figure 7-1 inset. 6. Place blade bell support on the blade. Align notches on the blade bell support with small holes in blade. 7. Replace hex bolt and tighten hex bolt to torque: 450 in. lbs. min., 600 in. lbs. max. To ensure safe operation of your mower, periodically check the blade bolt for correct torque. Belt Care NOTE: Several components must be removed in order to change the mower's belt. See an authorized Service Dealer to have your belt replaced. Blade Blade Bell Support Bolt Figure 7-1 3. Remove blade from the adapter for testing balance. 4. Balance the blade on a round shaft screwdriver to check. Remove metal from the heavy side until it balances evenly. When sharpening the blade, follow the original angle of grind. Grind each cutting edge equally to keep the blade balanced. 17
-
 1
1 -
2
-
3
-
4
-
5
-
6
-
7
-
8
-
9
-
10
-
11
-
 12
12 -
 13
13 -
 14
14 -
 15
15 -
 16
16 -
 17
17 -
 18
18 -
 19
19 -
 20
20 -
 21
21 -
 22
22 -
23
-
24
-
25
-
26
-
27
-
28
 |
 |
