Cuisinart CPC-600 User Guide - Page 4
Safety Valves, Cleaning, Troubleshooting - recipe
 |
UPC - 086279016058
View all Cuisinart CPC-600 manuals
Add to My Manuals
Save this manual to your list of manuals |
Page 4 highlights
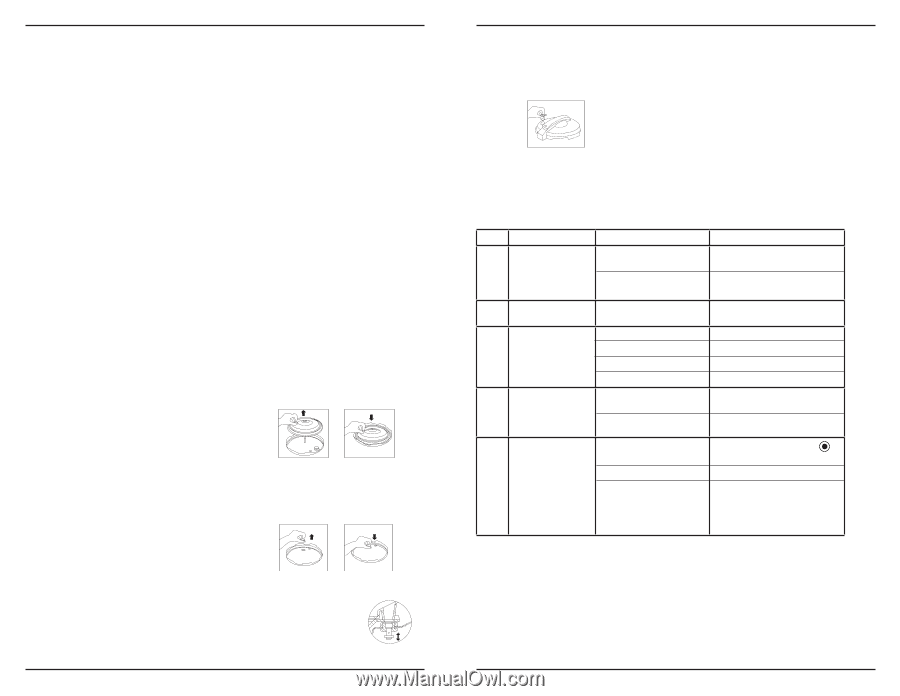
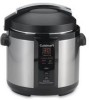
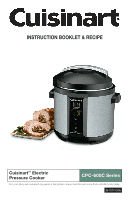
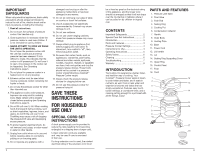
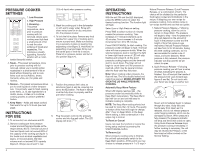
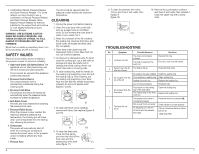
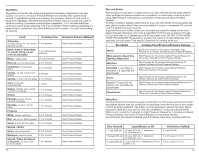
3. Combination Natural Pressure Release and Quick Pressure Release - For some recipes, we have chosen to use a combination of Natural Pressure Release and Quick Pressure Release. Allow Natural Pressure Release for the time indicated in the recipe (food will continue to cook slightly) followed by Quick Pressure Release. WARNING: USE EXTREME CAUTION WHEN RELEASING PRESSURE. USE TONGS OR SIMILAR UTENSIL TO PULL HANDLE OF PRESSURE LIMIT VALVE FORWARD. When float in handle is completely down, turn the lid clockwise and lift to remove. SAFETY VALVES There are seven safety devices installed in the pressure cooker to assure its reliability. 1. Open-and-Close Lid Safety Device The appliance will not start pressurizing until the lid is closed and locked properly. The lid cannot be opened if the appliance is filled with pressure. 2. Pressure Control Device The correct pressure level is automatically maintained during the cooking cycle. 3. Pressure Limit Valve The pressure limit valve will release air automatically when the pressure inside exceeds the preset temperature. 4. Anti-Block Cover Prevents any food material from blocking the pressure limit valve. 5. Pressure Relief Device When the pressure cooker reaches the maximum allowable pressure and temperature, the cooking pot will move down until lid separates from the sealing ring, releasing air pressure. 6. Thermostat The power will automatically shut off when the cooking pot temperature reaches the preset value, or the pressure cooker is heating without any food inside. 7. Thermal Fuse The circuit will be opened when the pressure cooker reaches the maximum temperature. CLEANING 1. Unplug the power cord before cleaning. 2. Clean the outer body with a soft cloth such as a paper towel or microfiber cloth. Do not immerse the outer body in water or pour water into it. 3. Rinse the underside of the lid including the sealing ring, pressure limit valve, antiblock cover, air escape and float valve. Dry completely. 4. Clean area under upper ring with dampened cloth or micro fiber cloth. Do not use chemical cleaners. 5. Cooking pot is dishwasher-safe. To handclean the cooking pot, use a soft cloth or sponge and wipe. Be careful not to damage the inside coating. Never use harsh chemicals or scouring pads. 6. To clean sealing ring, hold the handle on the sealing ring supporting cover and pull the sealing ring up. After cleaning, put the sealing ring supporting cover back. Note the side with the handle should face outward. Do not put it upside down (figures 7 and 8). (7) (8) 7. To clean anti-block cover, carefully remove and clean, then replace (figures 9 and 10). (9) 8. To clean the float valve, move the float gently, and rinse the food off the float valve and the sealing ring of the float valve (figure 11). (10) (11) 6 9. To clean the pressure limit valve, remove and rinse it with water, then replace it (figure 12). 10. Remove the condensation collector and clean it with water, then reinstall it. Clean the upper ring with a damp cloth. (12) TROUBLESHOOTING No. Symptom Possible Reasons Solutions 1 Lid does not lock The ring is not properly installed The float is seized by the push rod Reinstall the ring Push the push rod with hands 2 Cannot open the lid The float is still up after air exhaust Press the float down No sealing ring was installed Install the sealing ring 3 Air escapes from the Food residue on sealing ring Clean sealing ring rim of the lid Sealing ring worn out Replace the sealing ring Lid not locked properly Rotate lid fully Food stuck on the sealing Clean the sealing ring 4 Air escapes from the ring of the float valve float valve The sealing ring on the float Replace the sealing ring wore out 5 The float will not lift up The pressure limit valve is not placed properly Not enough food and water Air escaping from the rim of the lid and the pressure limit valve Place the device to pressure Check recipe for proper quantity Call our Consumer Service Centre toll free at 1-800-472-7606 7
-
 1
1 -
 2
2 -
 3
3 -
 4
4 -
 5
5 -
 6
6 -
 7
7 -
 8
8 -
 9
9 -
 10
10 -
11
-
12
-
13
-
14
-
15
-
16
-
17
-
18
 |
 |