Cuisinart DLC-2007N DLC-2007N Manual - Page 3
Important, Unpacking, Instructions - parts
 |
UPC - 086279113245
View all Cuisinart DLC-2007N manuals
Add to My Manuals
Save this manual to your list of manuals |
Page 3 highlights
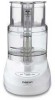
IMPORTANT UNPACKING INSTRUCTIONS This package contains a Cuisinart® Premier Series 7-Cup Food Processor, and the standard parts for it: Work bowl, work bowl cover, large and small pushers, dough blade, metal chopping/mixing blade, slicing disc, shredding disc, detachable disc stem for discs, spatula, how-to video and recipe/instruction book. CAUTION: THE CUTTING TOOLS HAVE VERY SHARP EDGES. To avoid injury when unpacking the parts, please follow these instructions. 1. Place the box on a low table or on the floor next to the kitchen counter or table where you intend to keep the food processor. Be sure the box is right side up. 2. Remove the cardboard insert. You will see a rectangular block of plastic foam that holds the processor parts, each fitted into a cavity in the foam. 3. The Detachable Disc Stem for the discs (A) sits in a cavity in one corner of the foam block. Remove this first. 4. The Pusher Assembly, with large and small pushers, (B) sits in the adjacent cavity. Remove this next. 5. The Dough Blade (C) rests in a cavity on the opposite side of the foam block. Remove it from the foam. 6. The plastic Spatula (D) is on one long side of the foam block. Remove it next. 7. The Slicing Disc (E) is on the edge of one of the long sides of the foam block; the Shredding Disc (F) is on the other side. Slide them out WITH GREAT CARE; THE BLADES ARE VERY SHARP. 8. Lift out the foam block. 9. Remove the instruction/recipe book. 10. Lift out the video from its space in the cardboard frame on one side of the box. Then lift out the cardboard frame. 11. The housing base with work bowl, metal blade and cover are at the bottom of the box. The metal blade is loose in the work bowl beneath a foam insert. Do not reach into feed tube. Do not turn over work bowl without first removing metal blade. Remove work bowl cover by turning it clockwise and lifting. 12. Remove the base and bowl together by grasping the plastic bowl at the top with both hands and lifting the bowl straight up. Do not rotate the bowl clockwise on the base. This will cause the bowl to separate from the base. 13. Place the food processor on the counter or table. Remove foam cylinder insert from top of metal chopping blade. Read the instructions thoroughly before using the machine. 14. Save the shipping cartons and plastic foam blocks. You will find them very useful if you need to repack the processor for moving or other shipment. Please watch the enclosed how-to video before using the food processor. NOTE: Remember to return your completed product registration card with all information carefully filled out. WHEN REMOVING BLADE: CAREFULLY REMOVE THE METAL BLADE BY GRASPING THE CENTER WHITE HUB AND LIFTING IT STRAIGHT UP. NEVER TOUCH THE BLADES, AS THEY ARE RAZOR SHARP. 2
-
 1
1 -
 2
2 -
 3
3 -
 4
4 -
 5
5 -
 6
6 -
 7
7 -
 8
8 -
 9
9 -
10
-
11
-
12
-
13
-
14
-
15
-
16
-
17
-
18
-
19
-
20
-
21
-
22
-
23
-
24
-
25
-
26
-
27
-
28
-
29
-
30
-
31
-
32
-
33
-
34
-
35
-
36
-
37
-
38
-
39
-
40
-
41
-
42
-
43
-
44
-
45
-
46
-
47
-
48
 |
 |
