D-Link DAP-1320 Quick Installation Guide - Page 7
Setup - password
 |
View all D-Link DAP-1320 manuals
Add to My Manuals
Save this manual to your list of manuals |
Page 7 highlights
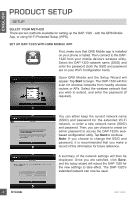
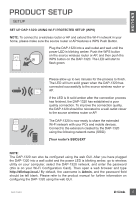
ENGLISH PRODUCT SETUP SETUP SET UP DAP-1320 USING Wi-Fi PROTECTED SETUP (WPS) NOTE: To connect to a wireless router or AP and extend the Wi-Fi network in your home, please make sure the source router or AP features a WPS Push Button. Plug the DAP-1320 into a wall outlet and wait until the power LED is blinking amber. Push the WPS button on the source wireless router or AP, and then push the WPS button on the DAP-1320. The LED will start to flash green. Please allow up to two minutes for the process to finish. The LED will turn solid green when the DAP-1320 has connected successfully to the source wireless router or AP. If the LED is lit solid amber after the connection process has finished, the DAP-1320 has established a poor quality connection. To improve the connection quality, the DAP-1320 should be relocated to a wall outlet closer to the source wireless router or AP. The DAP-1320 is now ready to share the extended Wi-Fi network with your PCs and mobile devices. Connect to the extension created by the DAP-1320 using the following network name (SSID): [Your router's SSID]-EXT NOTE: The DAP-1320 can also be configured using the web GUI. After you have plugged the DAP-1320 into a wall outlet and the power LED is blinking amber, go to wireless utility on your computer, select the DAP-1320 network, and enter the password (this is on your Wi-Fi Configuration Card). Then open a web browser and type http://dlinkap.local./ By default, the username is Admin, and the password field should be left blank. Please refer to the product manual for further information on configuring the DAP-1320 using the web GUI. DAP-1320 5
-
 1
1 -
 2
2 -
 3
3 -
 4
4 -
 5
5 -
 6
6 -
 7
7 -
 8
8 -
 9
9 -
 10
10 -
 11
11 -
 12
12 -
13
-
14
-
15
-
16
-
17
-
18
-
19
-
20
-
21
-
22
-
23
-
24
-
25
-
26
-
27
-
28
-
29
-
30
-
31
-
32
-
33
-
34
-
35
-
36
-
37
-
38
-
39
-
40
-
41
-
42
-
43
-
44
-
45
-
46
-
47
-
48
 |
 |
