D-Link DAP-2590 Product Manual - Page 38
Schedule
 |
UPC - 790069316043
View all D-Link DAP-2590 manuals
Add to My Manuals
Save this manual to your list of manuals |
Page 38 highlights
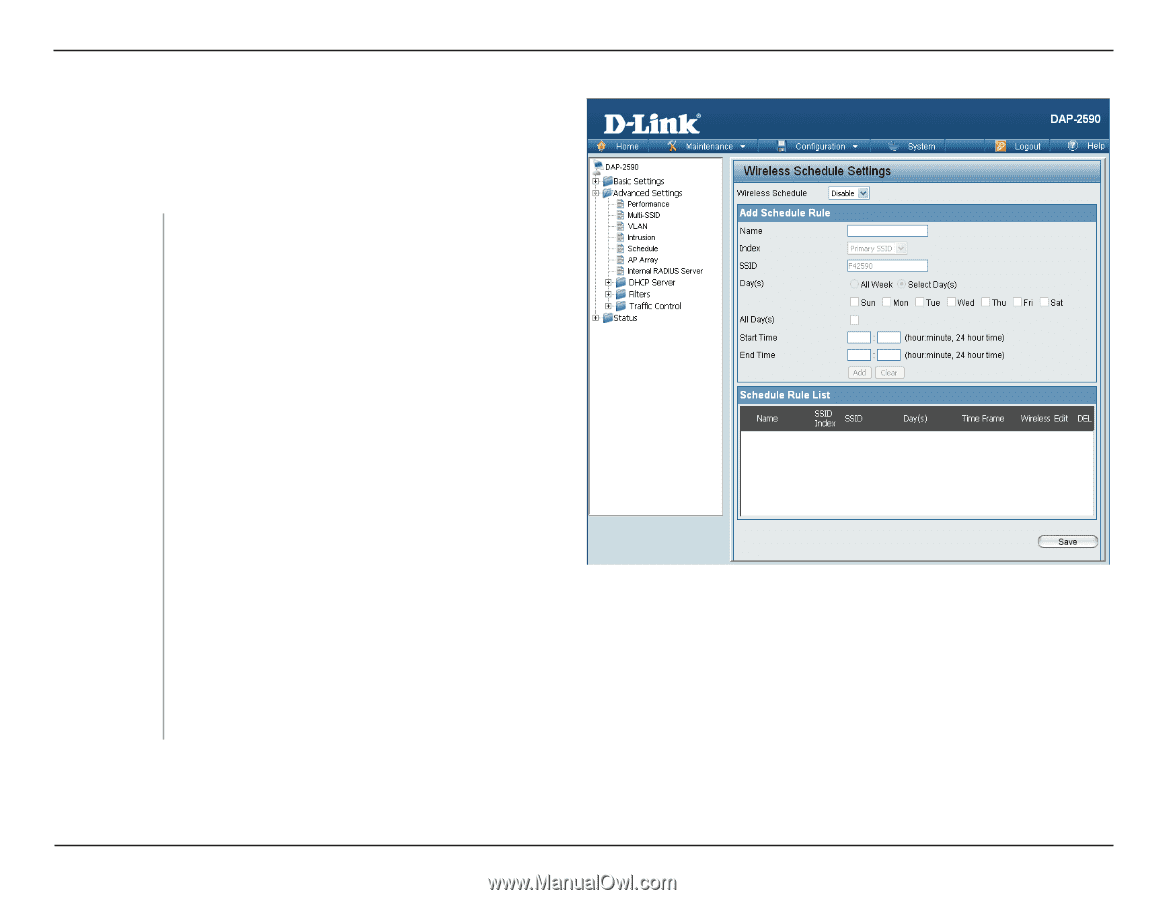
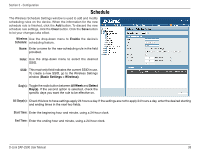
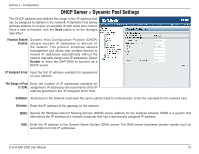
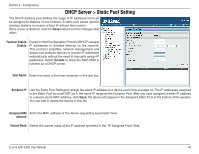
Section 3 - Configuration Schedule The Wireless Schedule Settings window is used to add and modify scheduling rules on the device. When the information for the new schedule rule is finished, click the Add button. To discard the new schedule rule settings, click the Clear button. Click the Save button to let your changes take effect. Wireless Use the drop-down menu to Enable the device's Schedule: scheduling feature. Name: Enter a name for the new scheduling rule in the field provided. Index: Use the drop-down menu to select the desired SSID. SSID: This read-only field indicates the current SSID in use. To create a new SSID, go to the Wireless Settings window (Basic Settings > Wireless). Day(s): Toggle the radio button between All Week and Select Day(s). If the second option is selected, check the specific days you want the rule to be effective on. All Days(s): Check this box to have settings apply 24 hours a day. If the settings are not to apply 24 hours a day, enter the desired starting and ending times in the next two fields. Start Time: Enter the beginning hour and minute, using a 24-hour clock. End Time: Enter the ending hour and minute, using a 24-hour clock. D-Link DAP-2590 User Manual 38
-
 1
1 -
2
-
3
-
4
-
5
-
6
-
7
-
8
-
9
-
10
-
11
-
12
-
13
-
14
-
15
-
16
-
17
-
18
-
19
-
20
-
21
-
22
-
23
-
24
-
25
-
26
-
27
-
28
-
29
-
30
-
31
-
32
-
 33
33 -
 34
34 -
 35
35 -
 36
36 -
 37
37 -
 38
38 -
 39
39 -
 40
40 -
 41
41 -
 42
42 -
 43
43 -
44
-
45
-
46
-
47
-
48
-
49
-
50
-
51
-
52
-
53
-
54
-
55
-
56
-
57
-
58
-
59
-
60
-
61
-
62
-
63
-
64
-
65
-
66
-
67
-
68
-
69
-
70
-
71
-
72
-
73
-
74
-
75
-
76
-
77
-
78
-
79
-
80
-
81
-
82
-
83
-
84
-
85
-
86
-
87
-
88
-
89
-
90
 |
 |