D-Link DCS-5030L User Manual - Page 24
thumbscrew to lock the arm in place.
 |
View all D-Link DCS-5030L manuals
Add to My Manuals
Save this manual to your list of manuals |
Page 24 highlights
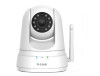
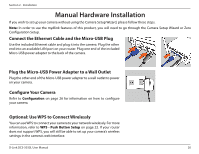
Section 2 - Installation Fasten the mounting bracket to the wall using the screws provided. 4 Do not overtighten the screws as this may crack the mounting bracket. Using the supplied thumbscrew, fasten the camera to the mounting bracket. Connect the power and Ethernet cables to the camera. 5 Adjust the angle of the arm on the mounting bracket as required. Tighten the thumbscrew to lock the arm in place. 6 D-Link DCS-5030L User Manual 24
-
 1
1 -
2
-
3
-
4
-
5
-
6
-
7
-
8
-
9
-
10
-
11
-
12
-
13
-
14
-
15
-
16
-
17
-
18
-
 19
19 -
 20
20 -
 21
21 -
 22
22 -
 23
23 -
 24
24 -
 25
25 -
 26
26 -
 27
27 -
 28
28 -
 29
29 -
30
-
31
-
32
-
33
-
34
-
35
-
36
-
37
-
38
-
39
-
40
-
41
-
42
-
43
-
44
-
45
-
46
-
47
-
48
-
49
-
50
-
51
-
52
-
53
-
54
-
55
-
56
-
57
-
58
-
59
-
60
-
61
-
62
-
63
-
64
-
65
-
66
-
67
-
68
-
69
-
70
-
71
-
72
-
73
-
74
-
75
-
76
-
77
-
78
-
79
-
80
-
81
-
82
-
83
-
84
 |
 |

24
D-Link DCS-5030L User Manual
Section 2 - Installation
5
6
Using the supplied thumbscrew, fasten the camera to the mounting bracket.
Connect the power and Ethernet cables to the camera.
Adjust the angle of the arm on the mounting bracket as required. Tighten the
thumbscrew to lock the arm in place.
4
Fasten the mounting bracket to the wall using the screws provided.
Do not overtighten the screws as this may crack the mounting bracket.