D-Link DCS-5300G Product Manual - Page 32
Important, Public, Private Port, Enabled, Private IP, Protocol Type, Apply., Scheduling, Always - dcs default ip address
 |
UPC - 790069269530
View all D-Link DCS-5300G manuals
Add to My Manuals
Save this manual to your list of manuals |
Page 32 highlights
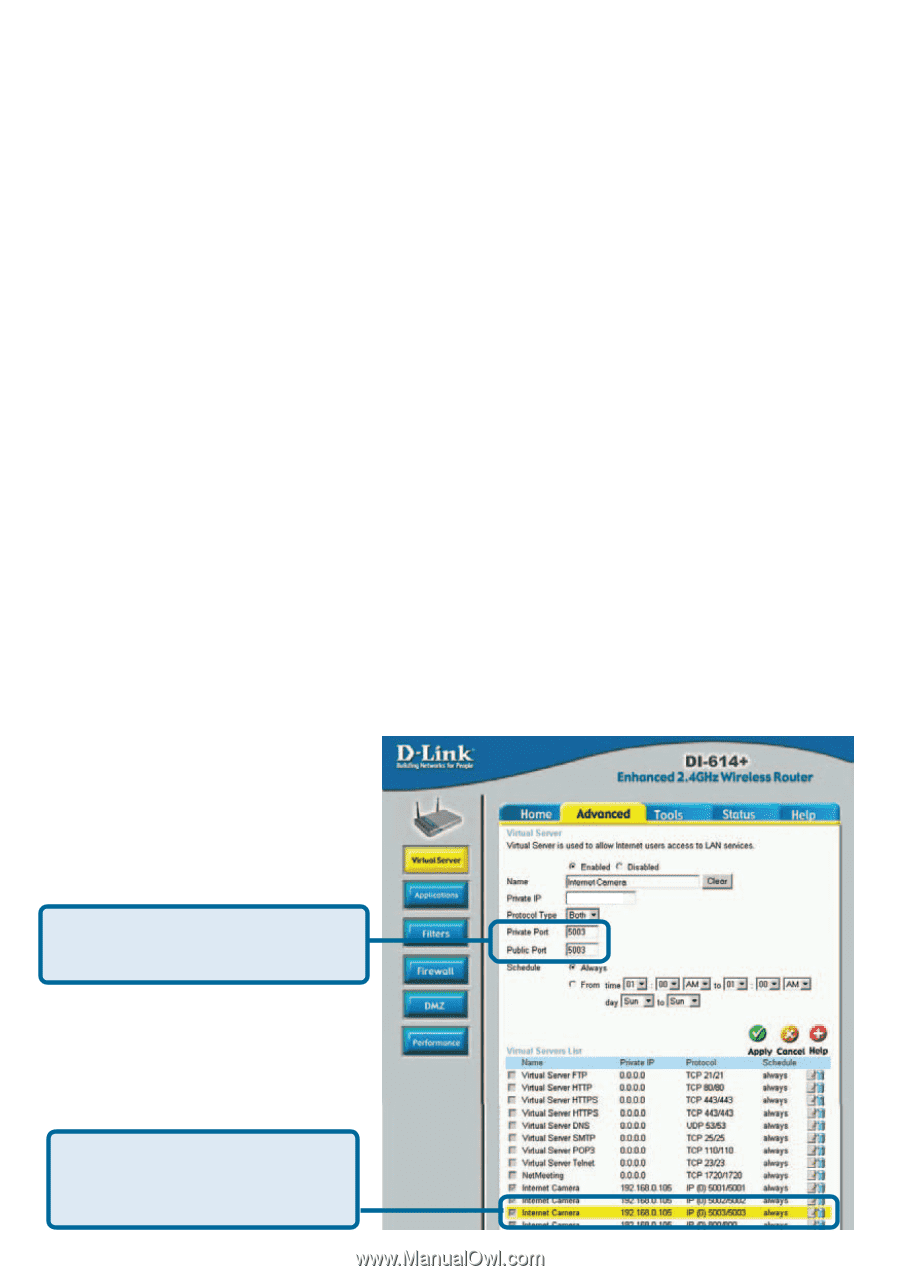
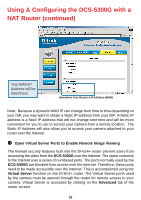
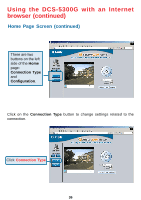
Using & Configuring the DCS-5300G with a NAT Router (continued) Follow these steps to configure your router's Virtual Server settings: • Click Enabled. • Enter a different name for each entry. • Enter your camera's local IP Address (e.g., 192.168.0.146 in the example in step on page 29) in the Private IP field. • Select Both under Protocol Type (TCP and UDP) • If you are using the default camera port settings, enter 80 in to the Public and Private Port section, click Apply. • Scheduling should be set to Always so that the camera images can be accessed at any time. Repeat the above steps adding ports 5001, 5002 and 5003 to both the Public and Private Port sections. A check mark appearing before the camera name will indicate that the ports are enabled. Important: Some ISPs block access to port 80 and other commonly used Internet ports to conserve bandwidth. Check with your ISP so that you can open the appropriate ports accordingly. If your ISP does not pass traffic on port 80, you will need to change the port the camera uses from 80 to something else, such as 800. Not all routers are the same, so refer to your user manual for specific instructions on how to open ports. Enter valid ports in the Virtual Server section of your router 192.168.0.102 Please make sure to check the box on this line to enable settings 32
-
 1
1 -
2
-
3
-
4
-
5
-
6
-
7
-
8
-
9
-
10
-
11
-
12
-
13
-
14
-
15
-
16
-
17
-
18
-
19
-
20
-
21
-
22
-
23
-
24
-
25
-
26
-
 27
27 -
 28
28 -
 29
29 -
 30
30 -
 31
31 -
 32
32 -
 33
33 -
 34
34 -
 35
35 -
 36
36 -
 37
37 -
38
-
39
-
40
-
41
-
42
-
43
-
44
-
45
-
46
-
47
-
48
-
49
-
50
-
51
-
52
-
53
-
54
-
55
-
56
-
57
-
58
-
59
-
60
-
61
-
62
-
63
-
64
-
65
-
66
-
67
-
68
-
69
-
70
-
71
-
72
-
73
-
74
-
75
-
76
-
77
-
78
-
79
-
80
-
81
-
82
-
83
-
84
-
85
-
86
-
87
-
88
-
89
-
90
-
91
-
92
-
93
-
94
-
95
-
96
-
97
-
98
-
99
-
100
-
101
-
102
-
103
-
104
-
105
-
106
-
107
-
108
-
109
-
110
-
111
-
112
-
113
-
114
-
115
-
116
-
117
-
118
-
119
-
120
-
121
-
122
-
123
-
124
-
125
-
126
-
127
-
128
-
129
-
130
-
131
-
132
-
133
-
134
-
135
-
136
-
137
-
138
-
139
-
140
-
141
-
142
-
143
-
144
-
145
 |
 |