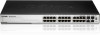
D-Link DGS-3100-24 Product Manual - Page 19
Defining Stacking Units
 |
UPC - 790069305122
View all D-Link DGS-3100-24 manuals
Add to My Manuals
Save this manual to your list of manuals |
Page 19 highlights
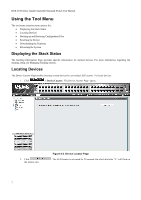
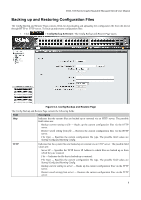
DGS-3100 Series Gigabit Stackable Managed Switch User Manual 1. On the Startup menu, press "2". The following prompt is displayed: Set new device Baud rate: _ 2. Press Enter to apply changes. Defining Stacking Units Use the Stack menu option to display the current stack unit ID list and define an alternative unit ID (stack membership number). Unit ID 0 is allocated for auto-numbering, which is the factory default. Refer to Managing Stacking for further reference. To access the stack menu: 1. On the Startup menu, press "3". The following prompt is displayed: Stack menu [1] Show unit stack id [2] Set unit stack id [3] Back Enter your choice or press 'ESC' to exit: 2. To display the current unit stack ID list, press "1". The following prompt is displayed: Stack menu [1] Show unit stack id [2] Set unit stack id [3] Back Enter your choice or press 'ESC' to exit: Current working mode is stacking. Unit stack id set to 0. ===== Press Enter to Continue ==== 3. To change the unit ID (stack membership number), press "2". The following prompt is displayed: Stack menu [1] Show unit stack id [2] Set unit stack id [3] Back Enter your choice or press 'ESC' to exit: Enter unit stack id [0-6]: 3
-
 1
1 -
2
-
3
-
4
-
5
-
6
-
7
-
8
-
9
-
10
-
11
-
12
-
13
-
 14
14 -
 15
15 -
 16
16 -
 17
17 -
 18
18 -
 19
19 -
 20
20 -
 21
21 -
 22
22 -
 23
23 -
 24
24 -
25
-
26
-
27
-
28
-
29
-
30
-
31
-
32
-
33
-
34
-
35
-
36
-
37
-
38
-
39
-
40
-
41
-
42
-
43
-
44
-
45
-
46
-
47
-
48
-
49
-
50
-
51
-
52
-
53
-
54
-
55
-
56
-
57
-
58
-
59
-
60
-
61
-
62
-
63
-
64
-
65
-
66
-
67
-
68
-
69
-
70
-
71
-
72
-
73
-
74
-
75
-
76
-
77
-
78
-
79
-
80
-
81
-
82
-
83
-
84
-
85
-
86
-
87
-
88
-
89
-
90
-
91
-
92
-
93
-
94
-
95
-
96
-
97
-
98
-
99
-
100
-
101
-
102
-
103
-
104
-
105
-
106
-
107
-
108
-
109
-
110
-
111
-
112
-
113
-
114
-
115
-
116
-
117
-
118
-
119
-
120
-
121
-
122
-
123
-
124
-
125
-
126
-
127
-
128
-
129
-
130
-
131
-
132
-
133
-
134
-
135
-
136
-
137
-
138
-
139
-
140
-
141
-
142
-
143
-
144
-
145
-
146
-
147
-
148
-
149
-
150
-
151
-
152
-
153
-
154
-
155
-
156
-
157
-
158
-
159
-
160
-
161
-
162
-
163
-
164
-
165
-
166
-
167
-
168
-
169
-
170
-
171
-
172
-
173
-
174
-
175
-
176
-
177
-
178
-
179
-
180
-
181
-
182
-
183
-
184
-
185
-
186
-
187
-
188
-
189
-
190
-
191
-
192
-
193
-
194
-
195
-
196
-
197
-
198
-
199
-
200
-
201
-
202
-
203
-
204
-
205
-
206
-
207
-
208
-
209
-
210
-
211
-
212
-
213
-
214
-
215
-
216
-
217
-
218
-
219
-
220
-
221
-
222
-
223
-
224
-
225
-
226
-
227
-
228
-
229
-
230
-
231
-
232
-
233
-
234
-
235
-
236
-
237
-
238
-
239
-
240
-
241
-
242
-
243
-
244
-
245
-
246
-
247
-
248
-
249
-
250
-
251
-
252
-
253
-
254
-
255
-
256
-
257
-
258
-
259
-
260
-
261
-
262
-
263
-
264
-
265
-
266
-
267
-
268
-
269
-
270
-
271
-
272
-
273
-
274
-
275
-
276
-
277
-
278
-
279
-
280
-
281
-
282
-
283
-
284
-
285
-
286
-
287
-
288
-
289
-
290
-
291
-
292
-
293
 |
 |
