D-Link DHP-W311AV User Manual - Page 12
Hardware Installation
 |
View all D-Link DHP-W311AV manuals
Add to My Manuals
Save this manual to your list of manuals |
Page 12 highlights
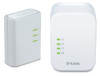
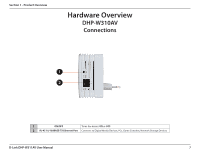
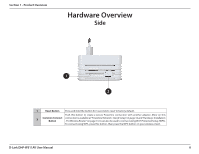
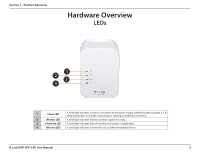
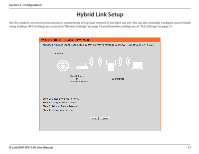
Section 2 - Installation Hardware Installation Power Plug the DHP-308AV into a wall outlet near your router. Plug the DHP-W310AV into a wall outlet where you want to extend your network. The Power LED on both will turn on to indicate they are receiving power. This may take up to 60 seconds. Connect the Devices Press the Common Connect Button on the DHP-308AV for 3 seconds. Then, press the Common Connect Button on the DHP-W310AV for 3 seconds. This must be done within two minutes after pressing the Common Connect Button on the DHP-308AV. The Powerline devices will reboot. Note: Network connectivity is confirmed when the Powerline LEDs on both Powerline devices are steadily lit. This will indicate that your network is now secure. Plug in the Ethernet Cable You should already own a router connected to a modem. Connect one of the supplied Ethernet cables between your router and the DHP-308AV. Connect the other Ethernet cable between your DHP-W310AV and your computer. Read the guidelines on the following pages, and continue to "DHP-W310AV Configuration" on page 16. Adding More Devices (optional) If you have more Powerline devices now or in the future, you may add them to your network in the same way as above. Be sure to press the Common Connect Button on the new device, then the Common Connect Button on the existing network. ROOM A ROOM B iPad Internet Router DHP-308AV DHP-W310AV Notebook D-Link DHP-W311AV User Manual 12
-
 1
1 -
2
-
3
-
4
-
5
-
6
-
 7
7 -
 8
8 -
 9
9 -
 10
10 -
 11
11 -
 12
12 -
 13
13 -
 14
14 -
 15
15 -
 16
16 -
 17
17 -
18
-
19
-
20
-
21
-
22
-
23
-
24
-
25
-
26
-
27
-
28
-
29
-
30
-
31
-
32
-
33
-
34
-
35
-
36
-
37
-
38
-
39
-
40
-
41
-
42
-
43
-
44
-
45
-
46
-
47
-
48
-
49
-
50
-
51
-
52
-
53
-
54
-
55
-
56
-
57
-
58
-
59
-
60
 |
 |
