D-Link DWA-160 Product Manual - Page 14
Push Button Configuration PBC - re
 |
UPC - 790069312144
View all D-Link DWA-160 manuals
Add to My Manuals
Save this manual to your list of manuals |
Page 14 highlights
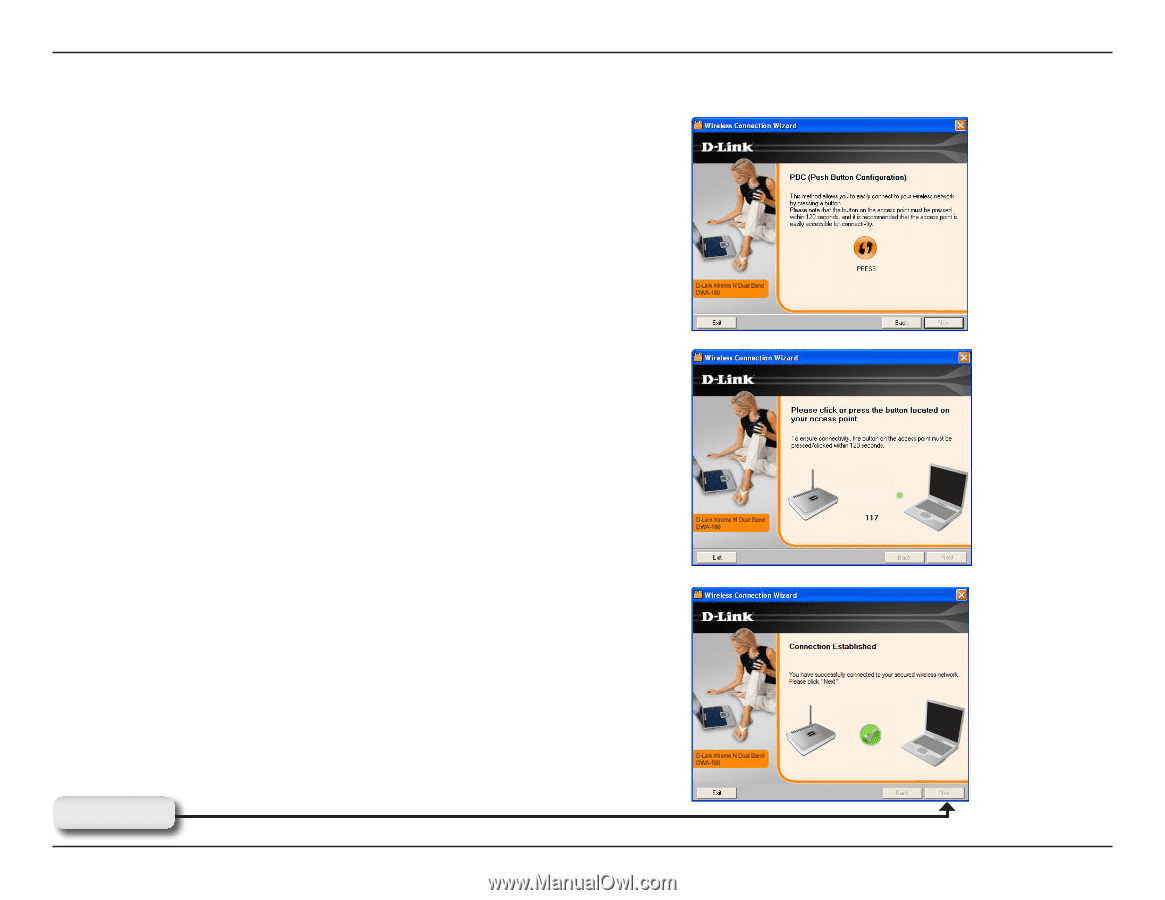
Section 2 - Installation Push Button Configuration (PBC) To connect to your network using the WPS push button configuration method, click the virtual button as shown in the screenshot. Note: You may also connect to your network by pressing the WPS button on the adaper and holding for two seconds until the wizard screen comes up. Then, press the WPS button on the router/access point to continue. Press the WPS button on your access point or wireless router within 2 minutes to establish connectivity. When this screen appears, you have successfully connected to your wireless network. Click Next to complete your setup. Click Next D-Link DWA-160 User Manual 14
-
 1
1 -
2
-
3
-
4
-
5
-
6
-
7
-
8
-
 9
9 -
 10
10 -
 11
11 -
 12
12 -
 13
13 -
 14
14 -
 15
15 -
 16
16 -
 17
17 -
 18
18 -
 19
19 -
20
-
21
-
22
-
23
-
24
-
25
-
26
-
27
-
28
-
29
-
30
-
31
-
32
-
33
-
34
-
35
-
36
-
37
-
38
-
39
-
40
-
41
-
42
-
43
-
44
-
45
-
46
-
47
-
48
-
49
-
50
-
51
-
52
-
53
-
54
-
55
-
56
-
57
-
58
-
59
-
60
 |
 |
1³
D-Link DWA-160 User Manual
Section ± - Installation
To connect to your network using the WPS push button
configuration method, click the virtual button as shown in the
screenshot.
Note:
You may also connect to your network by pressing the
WPS button on the adaper and holding for two seconds until the
wizard screen comes up. Then, press the WPS button on the
router/access point to continue.
Press the WPS button on your access point or wireless router
within 2 minutes to establish connectivity.
When this screen appears, you have successfully connected to
your wireless network. Click
Next
to complete your setup.
Click
Next
Push Button Configuration (PBC)