DIRECTV HR21 User Guide - Page 79
Making the Video Connections
 |
View all DIRECTV HR21 manuals
Add to My Manuals
Save this manual to your list of manuals |
Page 79 highlights
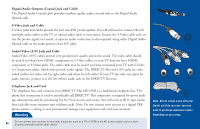
Making the Video Connections Choose one of the following connections: • Best (HD Video and Digital Audio): Connect the HDMI cables to the HDMI jacks on the DIRECTV Plus HD DVR and your TV. HDMI cables also carry digital audio, so you do not need to make a separate audio connection, unless you would like to use other audio outputs; for example, if you want to connect your DIRECTV Plus HD DVR to a stereo or home theater system. Note: HDMI cable is not included with the HD Receiver. • Better (HD Video): Connect one end of the Component (YPbPr) video cables to the COMPONENT OUT video jacks on the DIRECTV Plus HD DVR. Connect the other end of the component video cable to the component input on your TV, making sure to correctly match the red, green and blue connectors. You will need to connect audio separately. • Good (Non-HD): Connect one end of the S-Video cables to the S-VIDEO OUT jacks on the DIRECTV Plus HD DVR. Connect the other end to the S-Video input on your TV. Note: The SVideo cable will not provide an HD signal to your TV. • Not recommended (Non-HD): You can use RCA connectors to connect your DIRECTV Plus HD DVR to your TV, but it is not recommended. To get the best quality of image, use one of the above methods. However, if your TV does not support S-Video, component or HDMI connections, connect one end of the RCA cable (usually with a yellow plug) to the VIDEO OUT jack on the DIRECTV Plus HD DVR. Connect the other end to the video input on your TV. TIP To switch between watching your VCR and watching video from your DIRECTV Plus HD DVR, you may need to program the INPUT key on your DIRECTV Remote. (See page 76 for info.) Some TVs also have a MENU button that allows you to change the video source using an onscreen menu. If you have trouble changing the video source, refer to the instructions that came with your TV. Important To obtain optimum picture quality, make sure the receiver is connected directly to the TV. Connecting your TV directly to the Audio/Video output of your receiver will assure a more vivid picture and enhance your viewing enjoyment, particularly 68 when viewing copy-protected programming.
-
 1
1 -
2
-
3
-
4
-
5
-
6
-
7
-
8
-
9
-
10
-
11
-
12
-
13
-
14
-
15
-
16
-
17
-
18
-
19
-
20
-
21
-
22
-
23
-
24
-
25
-
26
-
27
-
28
-
29
-
30
-
31
-
32
-
33
-
34
-
35
-
36
-
37
-
38
-
39
-
40
-
41
-
42
-
43
-
44
-
45
-
46
-
47
-
48
-
49
-
50
-
51
-
52
-
53
-
54
-
55
-
56
-
57
-
58
-
59
-
60
-
61
-
62
-
63
-
64
-
65
-
66
-
67
-
68
-
69
-
70
-
71
-
72
-
73
-
 74
74 -
 75
75 -
 76
76 -
 77
77 -
 78
78 -
 79
79 -
 80
80 -
 81
81 -
 82
82 -
 83
83 -
 84
84 -
85
-
86
-
87
-
88
-
89
-
90
-
91
-
92
-
93
-
94
-
95
-
96
-
97
-
98
-
99
-
100
-
101
-
102
-
103
-
104
-
105
-
106
-
107
-
108
 |
 |