Dacor DRT304 Installation Instructions - Page 10
Installation Instructions - drt304s lp
 |
View all Dacor DRT304 manuals
Add to My Manuals
Save this manual to your list of manuals |
Page 10 highlights
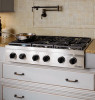
Installation Instructions Unpack the Cooktop Cooktop Installation warning • If the gas and electric service provided does not meet the product specifications, do not proceed with the installation. Call the dealer, the gas supplier or a licensed electrician. • The cooktop is heavy. A minimum of two people are required to safely install it. Unpack the parts box and verify that all required components have been provided. If any item is missing or damaged, please contact your dealer immediately. Do not install a damaged or incomplete appliance. The customer must report cosmetic issues within 30 days of installation. • Knobs (see table below) • Grates (see table below) • Standard burner caps (see table below) • Standard burner rings (see table below) • SimmerSear™ inner burner caps (see table below) • SimmerSear outer burner caps (see table below) • SimmerSear burner rings (see table below) • ¼ - 20 x 1 ½ hold down bolts - 2 (PN 83383) • ¼ - 20 washers - 2 hold down (PN 83203) • Regulator nat. gas (PN 62834) or LP (PN 72980) • Dacor Stainless Steel Cleaner (PN A302) • Literature kit WARNING • To prevent damage to the gas pressure regulator, install it only after the cooktop is mounted in its permanent position. • Do not over-tighten the hold down bolts. Over tightening the hold down bolts may result in improper operation of the dual gas burners. important Do not use a hardening compound or caulk to permanently seal the cooktop into place. The cooktop must be readily removable if service is required. Removal of sealant to service the unit will be performed at the customer's expense. 1. Lower the cooktop into the cutout while feeding the electrical cord into the utility cutout. Center the cooktop in the cutout. 2. Secure the cooktop to the countertop using the two (2) provided hold-down bolts and washers provided. Do not overtighten the bolts. Part Knobs, standard (PN 106575-04) Knobs, SimmerSear (PN 106575-05) 10 inch grate (PN 700037) 12 inch grate (PN 701196) 14 inch grate (PN 101524) Standard burner cap, small (PN 102593) Standard burner ring, small (PN 102594) Standard burner cap, large (PN 102590) Standard burner ring, large (PN 102591) SimmerSear burner ring (PN 102588) SimmerSear inner burner cap (PN 102585) SimmerSear outer burner cap (PN 102586) Quantity DRT304S 3 1 none none 2 1 1 2 2 1 1 1 Quantity DRT366S 4 2 1 2 none 2 2 2 2 2 2 2 8
-
 1
1 -
2
-
3
-
4
-
 5
5 -
 6
6 -
 7
7 -
 8
8 -
 9
9 -
 10
10 -
 11
11 -
 12
12 -
 13
13 -
 14
14 -
 15
15 -
16
 |
 |
