Dacor ER36D Installation Instructions
Dacor ER36D Manual
 |
View all Dacor ER36D manuals
Add to My Manuals
Save this manual to your list of manuals |
Dacor ER36D manual content summary:
- Dacor ER36D | Installation Instructions - Page 1
Installation Instructions Epicure® Range For use with models ER36D, ER36D-C, ER48D, ER48D-C Part No. 100843 Rev. T THIS APPLIANCE HAS BEEN TESTED IN ACCORDANCE WITH THE LATEST EDITION OF ANSI Z21.1 STANDARD FOR HOUSEHOLD GAS COOKING APPLIANCES. - Dacor ER36D | Installation Instructions - Page 2
Table of Contents Important Safety Instructions 1-3 Customer Service Information 3 Planning the Installation 4-6 Electrical Requirements 4 Gas Supply Requirements 4 Product Dimensions 5 Cabinet Layout 6 Installation Instructions 7-18 Preparing for Installation 7-9 Electrical Connection - Dacor ER36D | Installation Instructions - Page 3
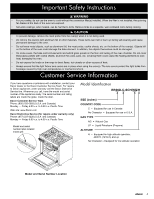
Important Safety Instructions and warnings in this manual are not meant to cover all possible problems and conditions that can occur. Use common sense and caution when installing, maintaining or operating this or any other appliance. Always contact the Dacor Customer Service Team about problems and - Dacor ER36D | Installation Instructions - Page 4
. • Do not touch the outside surfaces of the range during the self-clean cycle. They will be hot. Venting from the oven may cause the cooktop and backguard to become hot. • Make sure that all the cooktop parts are dry before lighting a burner. • Turn the knobs to the "OFF" position prior to removing - Dacor ER36D | Installation Instructions - Page 5
Time Web site: www.Dacor.com Dacor Distinctive Service (for repairs under warranty only) Phone: (877) 337-3226 (U.S.A. and Canada) Monday - Friday 6:00 a.m. to 4:00 p.m. Pacific Time Model and serial number label located inside grill Model Identification ER36D-C-SCH/NG/H SIZE (inches) COUNTRY CODE - Dacor ER36D | Installation Instructions - Page 6
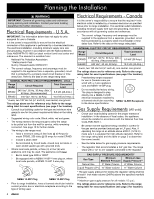
the data on the range rating label. NOMINAL ELECTRIC CIRCUIT REQUIREMENTS - U.S.A. Range Model Circuit Required Total Connected Load ER36D 240 Vac*, 60 Hz being installed is correct for the gas service provided (natural gas or LP gas). Also, if operating the range at an altitude above 4000 ft. - Dacor ER36D | Installation Instructions - Page 7
Planning the Installation Product Dimensions Product tolerances: ±1/16" (±1.6 mm) GAS - ELECTRICAL ACCESS DIMENSIONS Model A B C D E* ER36D 5 5/8" (142.9 mm) 18 3/8" (466.7 mm) 10 3/4" (273.0 mm) 13 11/16" (347.7 mm) 7/8" (22.2 mm) ER48D 3 13/16" (96.8 mm) 18 11/16" 9 3/8" 13 3/4" - Dacor ER36D | Installation Instructions - Page 8
height. • Any openings in the wall behind the appliance or in the floor underneath it must be sealed. CUTOUT DIMENSIONS Range Model F G ER36D 42" (1067 mm)* 36 1/16" 36" (914 mm)** (916 mm)** ER48D 54" (1372 mm)* 48 1/16" 48" (1219 mm)** (1221 mm)** * Recommended ** Minimum H 33 ½" (848 - Dacor ER36D | Installation Instructions - Page 9
kit • 1 GlideRack™ oven rack • Broiler pan/grill • 2 Standard size racks See the use and care manual for a list of optional parts and accessories. WARNING Do not connect the unit to gas or power before proceeding with the following sections. Level and Adjust the Range Height 1. Adjust the - Dacor ER36D | Installation Instructions - Page 10
range. See the ERV Installation Instructions, PN 103106. IMPORTANT: The ERV series raised vent attaches to the narrow back portion of the ERV style cutout. It is self-supporting Install the backguard before making the range gas and electrical connections. • Dacor recommends that the 24 inch backguard - Dacor ER36D | Installation Instructions - Page 11
causing personal injury. • Do not lift or carry the oven door(s) by the handle. NOTE: When installing a backguard, always install it before sliding the range into place. See page 8. To make the range easier to move, remove the door(s) to reduce weight. 1. Open the door to its fully opened position - Dacor ER36D | Installation Instructions - Page 12
• Do not disconnect any of the wires inside the range electrical box unless instructed to do so. • Make sure that the conduit or appliance cord is long enough to allow the range to be pulled out for service without disconnecting it from power. Refer to the range rating label (see page 3) for power - Dacor ER36D | Installation Instructions - Page 13
L1 terminal Neutral terminal L2 terminal Installation Instructions Jumper removed Grounding screw Red wire Green wire White wire Black wire Conduit strain relief nut Connecting 4 Wire Conduit to Range L1 terminal Neutral terminal Jumper link L2 terminal Black wire White wire Red wire Conduit - Dacor ER36D | Installation Instructions - Page 14
Installation Instructions Electrical Connection (Continued) Connecting the Conduit to the three (3) methods shown to connect the appliance to the junction box. 2. After connecting the conduit to the range (see page 10) connect the white wire from the appliance to the neutral (white) supply wire in - Dacor ER36D | Installation Instructions - Page 15
Installation Instructions Connection to power supply Junction box Separate No. 10 (minimum) copper grounding wire Fasten clamp tightly on pipe Wire nut 4 places Connection to appliance (Page - Dacor ER36D | Installation Instructions - Page 16
Instructions Electrical Connection (Continued) Connecting an Appliance Wire to the Range - Where Local Code Permits WARNING Do not connect the green appliance wire to the neutral (white) supply wire unless local building codes permit. 1. Remove the range tabs on the two parts of the strain relief - Dacor ER36D | Installation Instructions - Page 17
range rating label (see page 3 for location). Ranges intended for use with LP gas will have "LP" as a part of the model number. Consult your dealer if the range gas line needs to be long enough to allow the range to be pulled out for service. 3. Remove the gas regulator access cover. 4. Slide the - Dacor ER36D | Installation Instructions - Page 18
Installation Instructions Final Installation 1. Peel the protective coating off of the range, including the door. 2. Adjust the legs to the desired height. 3. Carefully slide the range into position in the cut-out. The rear anti-tip leg should engage the anti-tip bracket. Re-installing the Oven - Dacor ER36D | Installation Instructions - Page 19
Installation Instructions Cooktop Assembly WARNING Never attempt to operate the range's cooktop with any of the burner the spill tray. Put the legs of each grate inside the corresponding dimples. On model ER36D, the largest grate goes in the center. Crown burner Spill tray Stack burner STEP - Dacor ER36D | Installation Instructions - Page 20
still does not work, contact Dacor Distinctive Service at (877) 337-3226. Do not attempt to repair the appliance yourself. Have the model and serial numbers available when you call. See page 3 for location. Dacor is not responsible for the cost of correcting problems caused by a faulty installation - Dacor ER36D | Installation Instructions - Page 21
Notes 19 - Dacor ER36D | Installation Instructions - Page 22
Notes 20 - Dacor ER36D | Installation Instructions - Page 23
- Dacor ER36D | Installation Instructions - Page 24
Dacor ● 600 Anton Blvd. Suite 1000 Costa Mesa, CA 92626 ● Phone: (800) 793-0093 ● Fax: (626) 403-3130 ● www.Dacor.com
-
 1
1 -
 2
2 -
 3
3 -
 4
4 -
 5
5 -
 6
6 -
 7
7 -
8
-
9
-
10
-
11
-
12
-
13
-
14
-
15
-
16
-
17
-
18
-
19
-
20
-
21
-
22
-
23
-
24
 |
 |

Installation Instructions
Epicure
®
Range
Part No. 100843
Rev. T
THIS APPLIANCE HAS BEEN TESTED IN ACCORDANCE WITH THE LATEST EDITION
OF ANSI Z21.1 STANDARD FOR HOUSEHOLD GAS COOKING APPLIANCES.
For use with models ER36D, ER36D-C, ER48D, ER48D-C