Dacor ER36D Installation Instructions - Page 10
Installing an ERV Raised Vent Optional, Installing a Backguard Optional
 |
View all Dacor ER36D manuals
Add to My Manuals
Save this manual to your list of manuals |
Page 10 highlights
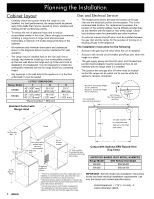
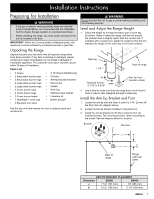
Installation Instructions Installing an ERV Raised Vent (Optional) Install the ERV raised vent before installing the range. See the ERV Installation Instructions, PN 103106. IMPORTANT: The ERV series raised vent attaches to the narrow back portion of the ERV style cutout. It is self-supporting in the cutout and does not actually attach to the range itself. Installing a Backguard (Optional) 4. To avoid scratches, place small scraps of thin cardboard on the rear of the side panels where the backguard will make contact. Place the backguard over the back of the range. Special attention should be given to the lower flange in front of the backguard, which must fit between the stainless steel side panels and over the existing stainless steel trim piece (see range side detail below). On the 24 inch backguard: The "C" channels on the backguard slide into the brackets on the range chassis. WARNING Do not operate the range without the island trim or a backguard installed. NOTES: • Install the backguard before making the range gas and electrical connections. • Dacor recommends that the 24 inch backguard be installed by at least two people. To install a backguard: 1. Remove the thirteen (13) screws on the front and back of the island trim and slide the trim off the unit. Sliding the Backguard Into Place Front flange of backguard Stainless steel trim piece Trim Removal 2. Remove the backguard from its box. 3. 24 inch backguard only: Use eight (8) hex screws from the backguard kit to attach the support brackets to the range chassis. Make sure the gas line is positioned under the bracket as shown below. Gas line Front of range Spill tray Cooktop chassis Back of backguard Range back cover Hex screw, 8 places Support Bracket Installation for 24 Inch Backguard 8 Range Side Detail
-
 1
1 -
2
-
3
-
4
-
 5
5 -
 6
6 -
 7
7 -
 8
8 -
 9
9 -
 10
10 -
 11
11 -
 12
12 -
 13
13 -
 14
14 -
 15
15 -
16
-
17
-
18
-
19
-
20
-
21
-
22
-
23
-
24
 |
 |
