Dacor ER36G Installation Instructions
Dacor ER36G Manual
 |
View all Dacor ER36G manuals
Add to My Manuals
Save this manual to your list of manuals |
Dacor ER36G manual content summary:
- Dacor ER36G | Installation Instructions - Page 1
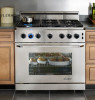
Installation Instructions Epicure® 36-Inch Gas Range For use with models ER36G and ER36GI Part No. 106554 Rev. D THIS APPLIANCE HAS BEEN TESTED IN ACCORDANCE WITH THE LATEST EDITION OF ANSI Z21.1 STANDARD FOR HOUSEHOLD GAS COOKING APPLIANCES. - Dacor ER36G | Installation Instructions - Page 2
Panel Type* Gas Type Standard Backguard* Operating Altitude** ER36GSCH/NG Full NG 6 Inch Below 4000 Ft. ER36GSCH/LP Full LP 6 Inch Below 4000 Ft. ER36GSCH/NG/H Full NG 6 Inch 4000 Ft. and over ER36GSCH/LP/H Full LP 6 Inch 4000 Ft. and over ER36GISCH/NG Partial NG 1 3/4 Inch - Dacor ER36G | Installation Instructions - Page 3
Instructions The Important Safety Instructions and warnings in this Manual are not meant to cover all possible problems and conditions that can occur. Use common sense and caution when installing, maintaining or operating this appliance. Always contact the Dacor Customer Service Team about problems - Dacor ER36G | Installation Instructions - Page 4
• Do not attempt to use this appliance in the event of a power failure. • Do not tamper with the controls. Do not adjust or alter any part of the range unless specifically instructed to do so in these instructions. • To prevent the unit from tipping forward and to provide a stable installation, this - Dacor ER36G | Installation Instructions - Page 5
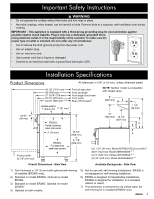
Important Safety Instructions WARNING • Do not operate the cooktop without the knobs mm)1 1 1/4" (32 mm) 1 9/16" (40 mm) Product width: 35 7/8" (911 mm) ER36GI: Partial stainless steel side panel 3" (76 mm) ER36G: Full stainless steel side panels 35 3/4" (908 mm) to 37 7/8" (962 mm) 19" (482 mm - Dacor ER36G | Installation Instructions - Page 6
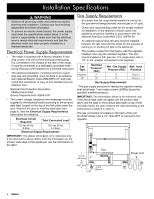
label. Gas Supply Requirements • Be certain that the range being installed is correct for the gas service being provided (natural gas or LP gas). plate below the door (remove the door according to the instructions on page 9 to view it). The gas connection is located on the back of the unit as - Dacor ER36G | Installation Instructions - Page 7
in the room, Dacor strongly recommends installing a range hood. A range hood should project horizontally 35 1/4" (895 mm) countertop opening 36" (914 mm) cabinet opening below countertop Dimensions Cabinet Depth Greater Than 24 Inches5 5 Model ER36GI only. Included self-rimming trim kit allows trim to - Dacor ER36G | Installation Instructions - Page 8
must be located so they do not interfere with the range when it is installed. ◊ The electrical outlet and gas shut off valve must be located so that the range can be pulled out for service while the appliance remains connected. • Both the gas supply piping and shut-off valve and the electrical - Dacor ER36G | Installation Instructions - Page 9
than the standard size, install it before pushing the range into place. Install the kit according to the accompanying installation instructions. Self-Rimming Trim Installation The self-rimming trim kit is for use with model ER36GI with a self-rimming cutout and low profile (1 3/4") backguard only - Dacor ER36G | Installation Instructions - Page 10
in step 10 and tighten into place. 13) Finish fastening the side panels to the range using the existing screws (B) removed in step 9. Two screws will be left over and may be discarded. B A B Control panel 9) Remove and retain the screws (4 each side) from the factory installed side panels on - Dacor ER36G | Installation Instructions - Page 11
Installation Instructions Install the Anti-Tip Bracket 1) Locate the anti-tip foot on the back of the range and turn it until the bottom of it is 1/16" (2 mm) off the floor. Back of range Door Removal Remove the door to make the range easier to move during the installation process. WARNING • Do - Dacor ER36G | Installation Instructions - Page 12
line needs to be long enough to allow the range to be pulled out for service. 3) Connect the gas line to the regulator on the back of the range. 4) Turn all cooktop control valves to the "OFF" position. 5) Turn on the gas supply valve and check all lines and connections for leaks using a "OFF - Dacor ER36G | Installation Instructions - Page 13
Installation Instructions Moving the Range to Final Location 1) Peel the protective plastic coating off of the range, including the range door. 2) Uncoil the power cord and route it to the electrical outlet so that it does not become trapped behind the range when it is pushed back. Do not connect - Dacor ER36G | Installation Instructions - Page 14
Installation Instructions Cooktop Assembly WARNING Never attempt to operate the range's cooktop with any of the burner rings, burner caps or grates removed. 1) Remove the burner rings, burner caps and grates from their shipping cartons. 2) Install - Dacor ER36G | Installation Instructions - Page 15
Installation Instructions Verifying Proper Operation WARNING Before operating the range, read the accompanying use and care manual completely. 1) Before beginning the test procedure, make sure all range control valves are in the "OFF" position, and all burner rings, burner cap and grates are - Dacor ER36G | Installation Instructions - Page 16
-GREEN V-VIOLET W B P11 P9 BROIL HSI BAKE HSI BR BR P8 P10 BB BBBBB 76 54 3 21 P5 ER36G Controller Board P4 43 21 W B WB P1 3 21 WWW P2 21 P7 2 4 6 8 10 13 5 7 9 IGNITER BR BR W BR Y TO BROIL BURNER TO BAKE BURNER GAS VALVE W GAS INLET W W RESET HI-LIMIT (250° F) B B CONVECTION - Dacor ER36G | Installation Instructions - Page 17
Notes 15 - Dacor ER36G | Installation Instructions - Page 18
Notes 16 - Dacor ER36G | Installation Instructions - Page 19
- Dacor ER36G | Installation Instructions - Page 20
Dacor ● 600 Anton Blvd. Suite 1000 Costa Mesa, CA 92626 ● Phone: (800) 793-0093 ● Fax: (626) 403-3130 ● www.Dacor.com
-
 1
1 -
 2
2 -
 3
3 -
 4
4 -
 5
5 -
 6
6 -
 7
7 -
8
-
9
-
10
-
11
-
12
-
13
-
14
-
15
-
16
-
17
-
18
-
19
-
20
 |
 |
Installation Instructions
Epicure
®
36-Inch Gas Range
Part No. 106554
Rev. D
THIS APPLIANCE HAS BEEN TESTED IN ACCORDANCE WITH THE LATEST EDITION
OF ANSI Z21.1 STANDARD FOR HOUSEHOLD GAS COOKING APPLIANCES.
For use with models ER36G and ER36GI