Dacor ER36G Installation Instructions - Page 14
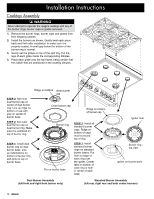
Cooktop Assembly
 |
View all Dacor ER36G manuals
Add to My Manuals
Save this manual to your list of manuals |
Page 14 highlights
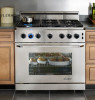
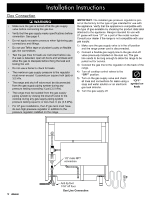
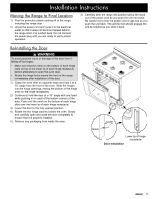
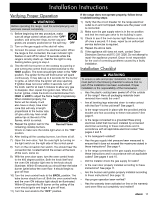
Installation Instructions Cooktop Assembly WARNING Never attempt to operate the range's cooktop with any of the burner rings, burner caps or grates removed. 1) Remove the burner rings, burner caps and grates from their shipping cartons. 2) Install the burners as shown. Gently twist each piece back and forth after installation to make sure it is properly seated. A small gap below the bottom of the burner ring is normal. 3) Gently set the grates on top of the spill tray. Put the legs of each grate inside the corresponding dimples. 4) Place each grate onto the top frame, being certain that the rubber feet are positioned in the locating dimples. Ridge on bottom Inner burner cap STEP 3: Set inner dual burner cap on center of dual burner ring. Line up ridge on bottom of cap with pins on center of burner base. Outer burner cap Ridge on bottom of burner cap STEP 2: Set outer dual burner cap on dual burner ring. Make sure it is centered on top of burner ring. Burner ring STEP 2: Install all standard burner caps. Ridge on bottom of caps must surround top of ring. STEP 1: Install dual burner ring on dual burner base. Line up indentations on bottom of burner ring with pins on top of burner base. Pin on burner base STEP 1: Install standard burner rings on standard burner bases. Put hole on edge of each ring over the igniter. Center tabs on bottom of each ring in hole in center of each base. Igniter hole Burner ring top view Igniter on burner base Dual Burner Assembly (left front and right front burner only) Standard Burner Assembly (left rear, right rear and both center burners) 12
-
 1
1 -
2
-
3
-
4
-
5
-
6
-
7
-
8
-
 9
9 -
 10
10 -
 11
11 -
 12
12 -
 13
13 -
 14
14 -
 15
15 -
 16
16 -
 17
17 -
 18
18 -
 19
19 -
20
 |
 |
