Dacor ERV48 Installation Instructions - Page 14
Verifying Proper Operation, Installation Checklist
 |
View all Dacor ERV48 manuals
Add to My Manuals
Save this manual to your list of manuals |
Page 14 highlights
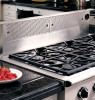
Installation Instructions Verifying Proper Operation Installation Checklist warning • Read the raised vent use and care manual completely before operation. • Install all of the front filters prior to operating the raised vent. Refer to the use and care manual for filter installation instructions. caution To prevent damage to the raised vent power cord, route it away from the surfaces of the range or cooktop before connecting it. 1. Make sure the power switch on the top of the raised vent is in the up position. 2. Plug the raised vent power plug into the electrical outlet. 3. Press the power switch once to raise the vent to its operating position. 4. Once in the up position the vent should begin to draw air. Turn the variable speed control switch in both directions to verify that the system is operating correctly. 5. Press the top cap up/down switch once to lower the vent. 6. Make sure that the top cap on the raised vent intake does not catch on the back edge of the cooktop or range when the intake is lowered. If interference occurs, adjust the position of the cooktop or range. Failure to eliminate any interference may result in permanent damage to the vent. If the raised vent is not operational after installation: • Make sure that power is being supplied to the unit. • Make sure that power is being supplied to the blower from the raised vent. • If the vent will not raise properly or makes a scraping sound check for obstructions interfering with the raising of the unit. If the raised vent still does not function after performing the above checks, do not attempt to repair it yourself. Contact Dacor Distinctive Service at (877) 337-3226. Be sure to have all model and serial numbers from the product data labels for the raised vent and the blower available when you call. Dacor is not responsible for the cost of correcting problems caused by a faulty installation. □□ Are the anchor legs extended down to make contact with the floor and tightened into place? Are the anchor legs fastened to the floor? Is the unit level? □□ Is the duct work completely installed? Are all joints attached with sheet metal screws and wrapped with duct tape? □□ Are both ends of the remote or in-line blower power cable connected (to the raised vent and to the blower itself)? □□ Are the vent filters installed according to the use and care manual instructions? □□ Is the power cord routed away from the hot surfaces of the range or cooktop. □□ Is the unit connected to an electrical outlet that meets the electrical specifications in these instructions? □□ Has proper operation been verified? □□ Has the warranty been activated on-line or the warranty card been filled out completely and mailed? 12
-
 1
1 -
2
-
3
-
4
-
5
-
6
-
7
-
8
-
 9
9 -
 10
10 -
 11
11 -
 12
12 -
 13
13 -
 14
14 -
 15
15 -
 16
16
 |
 |
