Dacor MRES30S Installation Instructions - Page 8
Re-installing the Oven Door - weight
 |
View all Dacor MRES30S manuals
Add to My Manuals
Save this manual to your list of manuals |
Page 8 highlights
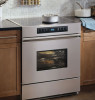
Installing the Range Measure from the floor to the countertop and adjust the leveling legs as required to position the top frame at the desired height, based on the cabinet and countertop installation. Carefully slide the range into position in the cutout. The left rear leveling leg should engage the anti-tip bracket. When the range is to be installed as a "slide-in, self rimming" (with the range top overhanging the countertop cutout), measure from the floor to the countertop. Adjust the leveling legs to position the bottom edge of the range top frame approximately 1/8" (13mm) above the level of the countertop. This will allow the range to slide over the countertop. Carefully slide the range into position in the cutout. Again, the left rear leveling leg should engage the anti-tip bracket. To lower the range onto the countertop, turn the leveling legs counterclockwise. Lower the range until the bottom of the range top just contacts the countertop. Do not allow the full weight of the range to hang on the counter. Re-installing the Oven Door Grasp the oven door on opposite sides and lift it until the door hinges are aligned with the openings in the oven frame. Holding the door at about a 30˚ angle from the horizontal, slide the hinges into the openings until the bottom hinge arms drop fully into the hinge receptacles. Lower the door to the fully opened position, and then rotate the two hinge catches toward the oven. Open and close the door completely to ensure that it is properly installed. Peel off the protective layer of plastic that covers the door panel. Verify Proper Operation NOTE: Prior to operating the cooktop or oven sections of the range, please read the accompanying use and care manual carefully. Important safety, service and warranty information is contained within this manual. NOTE: When the unit is powered on for the first time, the cooktop control will go through a self-check routine. When the self-check is complete, the cooktop control will go into SECURE mode. See the use and care manual for secure mode instructions. To turn on the power supply to the range. Set the time of day by pressing the "CLOCK" key and then pressing either of the "TIME•TEMP" keys ("+" or "-" keys) to advance or reduce the time in the display in the desired setting. Turn an element, tap the "ON/OFF" key then tap the slew up/down area of the desired element. The element will come on at a setting of the number touched and may be adjusted up or down by slewing up or down on the appropriate key area with your finger. To activate the Dual Outer Element, tap the circle key at the end of the slew area (second row), then tap or slew your finger up or down on the second row of numbers. The outer ring element will come on at a setting of the number touched last. To turn the element off, tap the "ON/OFF" key. You may turn off all active elements at the same time by tapping twice on the "CANCEL•SECURE" key located below the controls. If either the oven or cooktop does not operate properly, follow these troubleshooting steps: 1. Verify that power is supplied to the range. 2. Check the electrical connections to ensure that the installation has been completed correctly. 3. Repeat the above tests. 4. If the appliance still does not work, contact Dacor Distinctive Service at (877) 337-3226. Do not attempt to repair the appliance yourself. Have the model and serial numbers available when you call. See page 1 for location. Dacor is not responsible for the cost of correcting problems caused by a faulty installation. ON/OFF ON/OFF ON/OFF ON/OFF CANCEL • SECURE "SLEW UP/DOWN" Element Control Within 5 seconds, the element should be fully energized and glowing red. Verify that the residual heat indicator light comes on in conjunction with the proper element within approximately 30 seconds. 7
-
 1
1 -
2
-
 3
3 -
 4
4 -
 5
5 -
 6
6 -
 7
7 -
 8
8 -
 9
9 -
 10
10 -
 11
11 -
 12
12
 |
 |
