Dacor SGM304 Installation Instructions - Page 11
Installing the Burner Components, Verifying Proper Operation - gas cooktop #
 |
View all Dacor SGM304 manuals
Add to My Manuals
Save this manual to your list of manuals |
Page 11 highlights
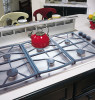
Installation Instructions Installing the Burner Components Verifying Proper Operation warning • Never attempt to operate the cooktop with any of the burner parts removed. • Do not attempt to adjust the burner air mixture settings. All adjustments are preset at the factory. 1. Remove the burner heads, burner rings, burner caps and grates from their shipping packages. 2. Install the burners as shown. When installing the burner components, twist each piece back and forth slightly until it drops completely into place. The burners will not operate properly unless all of the burner pieces are properly seated. 3. Gently set the grates on top of the spill tray. Make sure that the rubber feet are positioned in the dimples. Grate Burner cap Burner ring Top frame Burner head (fixed) Cooktop Burner Components Tabs 5 places warning • Make sure that power to the electrical outlet is turned off at the circuit breaker panel or fuse box and that the gas is turned off at the gas supply valve before proceeding. • The cooktop must be properly grounded at all times when electrical power is applied. Prior to operating the cooktop, read the accompanying use and care manual carefully. 1. Make sure all the cooktop burner controls are in the OFF position. 2. Connect the power cord to the electrical outlet. 3. Turn on power to the electrical outlet at the circuit breaker or fuse box. 4. Depress and turn one burner control knob at a time slowly counterclockwise to the HIGH position. Verify that the associated burner igniter sparks, then return the knob to the OFF position. Repeat for all of the remaining control knobs. 5. Turn on the gas supply valve. 6. Perform the following ignition test for all of the burners: • Press and turn the control knob slowly counterclockwise to the HIGH position. Only the selected burner will spark. It may take up to four seconds for the burner to ignite, at which time the igniter will stop sparking. If ignition does not occur within four seconds, turn off the knob, wait for at least five minutes to allow any gas to dissipate, then repeat the test. Knob Low position Off position Notches 5 places Burner Ring Installation Detail Area of operation Knob position indicator (polished surface) Burner designation Light and high position Burner Control Knob Continued... 9
-
 1
1 -
2
-
3
-
4
-
5
-
 6
6 -
 7
7 -
 8
8 -
 9
9 -
 10
10 -
 11
11 -
 12
12 -
 13
13 -
 14
14 -
 15
15 -
 16
16 -
17
-
18
-
19
-
20
 |
 |
