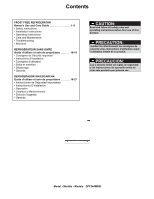
Danby DFF344WDB Product Manual - Page 5
Installation Instructions - parts
 |
View all Danby DFF344WDB manuals
Add to My Manuals
Save this manual to your list of manuals |
Page 5 highlights
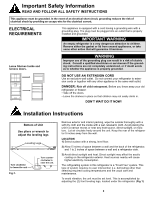
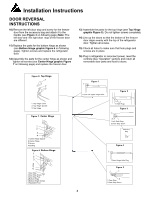
Installation Instructions DOOR REVERSAL INSTRUCTIONS NOTES: • This appliance is intended for FREE-STANDING INSTALLATION ONLY, and is NOT intended to be built-in. • Before connecting this appliance to electrical power supply, leave it to stand for approx. 24 hours, which will reduce the possibility of malfunction in the cooling system due to transport handling. • This appliance is approved for INDOOR USE ONLY and is NOT intended for outdoor operation. IMPORTANT Install this appliance in an area where the ambient temperature is between 55°F (13°C) and 90°F (32°C). If the temperature around the appliance is too low or high, cooling ability may be affected. Your refrigerator is built with a reversible door. You have the choice of either opening it from the left or the right side. In order to reverse the opening direction of your door, please follow these simple instructions: IMPORTANT Before you begin, unplug refrigerator or disconnect power. Remove food and any adjustable door or utility bins from doors. To avoid injury to yourself and/or property, we recommend that someone assists you during the door reversal process. 1) Unplug refrigerator or disconnect power. 2) Keep both doors closed until you are ready to remove them. Note: Provide additional support for the doors while the hinges are being moved. Do not depend on the door magnets to hold the doors in place. 3) Remove the parts for the top hinge as shown in Top Hinge graphic Figure 8 on following page. Lift off freezer door. 4) Remove the parts for the center hinge as shown in the Center Hinge graphic Figure 7 on following page. Lift off refrigerator door. 5) Remove the parts for the bottom hinge as shown in the Bottom Hinge graphic Figure 6 on following page. 6) Remove the cover of upper hinge holes from left side and move it to opposite side (see Figure 1 on following page). 7) Remove hole plugs from left side and move them to opposite side (see Figure 2 on following page). 8) Remove door hinge hole plug from the top of freezer and refrigerator door (see Figure 4 on following page). 9) Remove the door stop from refrigerator door and move to the other side (see Figure 5 on following page). 3
-
 1
1 -
 2
2 -
 3
3 -
 4
4 -
 5
5 -
 6
6 -
 7
7 -
 8
8 -
 9
9 -
 10
10 -
 11
11 -
12
-
13
-
14
-
15
-
16
-
17
-
18
-
19
-
20
-
21
-
22
-
23
-
24
-
25
-
26
-
27
-
28
-
29
-
30
 |
 |
